Technical Guide: Integrating Pneumatic Grippers with Zaber XYZ Gantries
By Alexandre Malkowski, Mechanical Engineering Team
Published on Mar. 25, 2026
A Technical Guide for Pick-and-Place Automation
Zaber’s XYZ gantry robots provide a precise and reliable framework for automation. By adding the right end-of-arm tooling (EOAT) you transform these motion systems into functional pick and place machines.
Many high-throughput applications rely on the durability and power-to-weight ratio of pneumatic grippers. Common examples include automated liquid handling in laboratory environments or small-part assembly in industrial manufacturing.
This article acts as a technical integration guide to help you combine a pneumatic gripper with any Zaber XYZ gantry system. We will walk through the specific steps of the build—from selecting compatible valves and tubing that fit within Zaber cable guides to wiring and programming a controller to actuate your gripper. Whether you are automating test tube sorting, part transfer between production stages, or IC depalletizing, this guide ensures your pneumatic components and Zaber stages work as a single, synchronized system.
Gripper Selection & Compatibility
Choosing the right pneumatic components is critical to maintaining the precision and payload capacity of your Zaber gantry. Use the following criteria to ensure your end-effector hardware is compatible with your motion system.
1. Pneumatic Gripper Selection
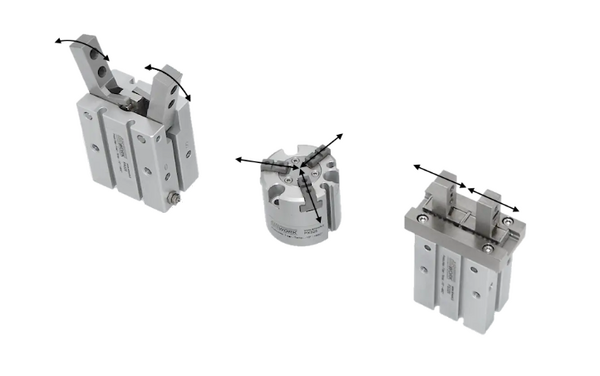
Mechanism Type:
- Parallel Grippers: Use these for high-precision parts; they maintain consistent pressure and are the industry standard for pick and place.
- Angular Grippers: Ideal for irregular shapes where a "wrapping" motion provides better mechanical retention, rather than pure friction.
- Three-Finger Grippers: Best for self-centering round objects like test tubes or bar stock.
Action Type:
- Single-Acting: Simple to integrate (one air line) and provides a "fail-safe" home position if power is lost.
- Double-Acting: Offers consistent speed and force in both directions, making them more versatile for complex handling.
Stroke & Speed: Shorter strokes require less air volume, leading to faster cycle times. If your part sizes are consistent, choose the smallest stroke possible to maximize throughput.
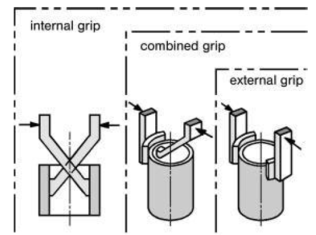
Grip Types: Depending on where you grip your part determines the stroke length required, so it’s important to keep in mind the options for gripping your part if you want to increase efficiency.
- Internal: Gripping an object from an inside feature, such as a pocket or hole. Good for objects larger than the stroke of the gripper and for tight spaces
- External: Grips on the outside of the object. Great for objects with no internal features, which only allow gripping from external surfaces. External gripping may require longer strokes or custom offset fingers can be designed.
- Combined: Gripping on both the outside and inside surfaces of the object. This method is suitable for objects with large pockets or holes. But the object is not centered or requires asymmetric fingers.
Note: When selecting a gripper, remember to ensure the combined weight of the gripper, fingers, and payload does not exceed the gantry’s rated capacity (e.g., 90 N for the LC40).
2. Control & Plumbing
The plumbing and control of the pneumatic system is just as important as the gripper itself.
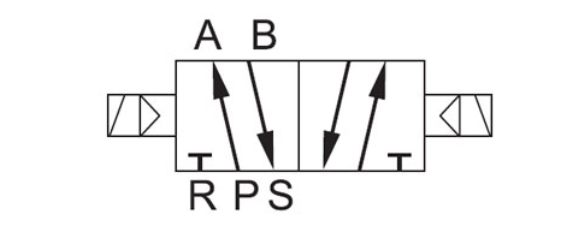
- Directional Control Solenoid Valves: Choose a 5-way valve for either a double or single acting gripper.
- Solenoid Driver: Zaber offers a universal process controller called the X-SCA, that can drive the solenoid valve from one of its output channels. Most valves are rated for 24 VDC, and the X-SCA4 is rated for up to 48 VDC.
- Tubing (Polyurethane vs. Nylon): For robotic gantries, Polyurethane (PU) is recommended over Nylon. PU is more flexible and abrasion-resistant, which is essential when routing through cable guides.
- Pro Tip: Ensure the hose’s minimum bend radius is no more than 19 mm (0.75") to prevent kinking and fatigue within the gantry’s cable guides.
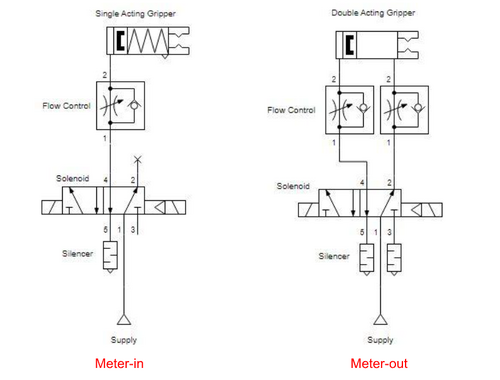
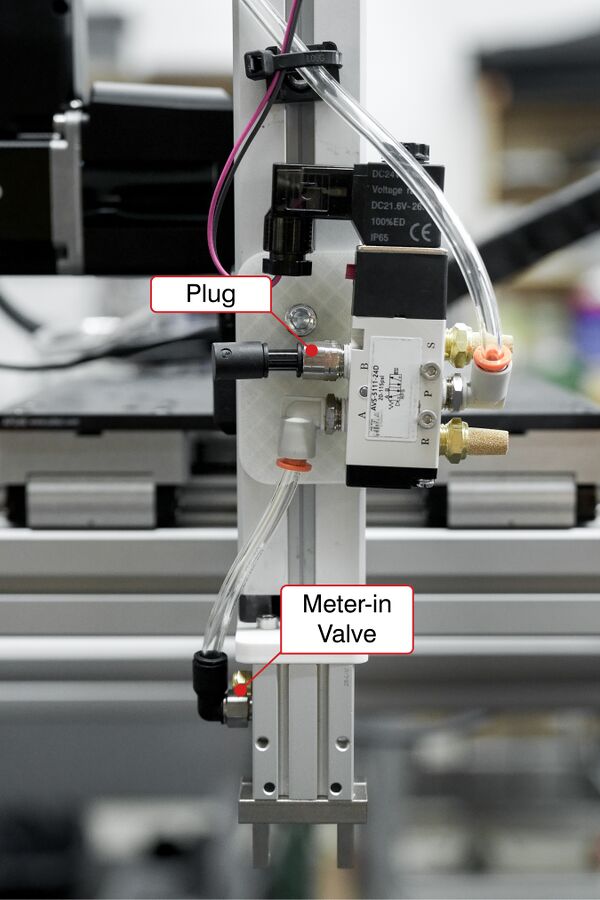
- Flow Control (Meter-In vs. Meter-Out): To prevent "jittery" motion, use meter-out configurations for double-acting cylinders. This creates backpressure, resulting in smoother, more controlled gripping. For a single-acting cylinder use meter-in configuration.
3. Where to Buy Pneumatics & Grippers
The pneumatics market ranges from general-purpose hardware to high-precision engineering tools. Your choice should be dictated by the required precision, duty cycle, and integration complexity. The following vendors are commonly used by our customers and represent reliable starting points for sourcing components. This is not an exhaustive list, and most standard pneumatic hardware from other reputable manufacturers will interface seamlessly with Zaber systems.
- Sourcing Components (Fittings & Valves): SMC, Festo, and Parker are the gold standards for reliability. If you require fast lead times or lower price points, distributors like AutomationDirect, McMaster-Carr, and Grainger are the preferred choices for North American integrators.
- High-Performance Grippers: For high-load or high-stakes applications, Schunk and Zimmer Group offer premium solutions. The Schunk PGN-plus-P is an industry benchmark, utilizing multi-tooth guidance to handle higher finger loads and a longer operational lifespan than standard T-slot designs.
- Budget-Friendly Grippers: For simpler pick-and-place tasks where cost is the primary constraint, AutomationDirect’s NITRA brand offers a robust entry point. These provide reliable performance for standard industrial use without the premium price tag of specialized variants.
Assembly and Integration Guide
This next section will explain detailed assembly steps and considerations to successfully build and integrate a pneumatic gripper with a Zaber gantry.
Assembly steps summary:
1. Assemble the gantry following the user manual.
2. Build a frame to raise the gantry, if necessary.
3. Mount the gripper to the Z-axis stage using a custom bracket.
4. Thread push-to-connect fittings and flow control valves to the gripper and solenoid valve.
5. Mount the solenoid valve to the Z-axis stage or outside the gantry.
6. Route the pneumatic tubing through the cable guides and connect them to the gripper and valve.
7. Connect, configure and verify functionality of devices.
8. Automate the system with Zaber Motion Library.
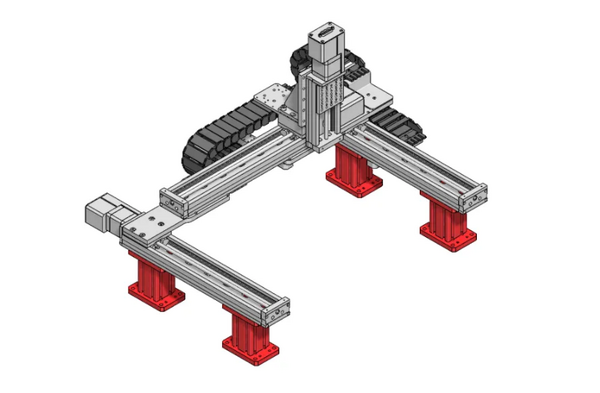
1. Design and Assemble the Gantry
To design and order a gantry, use Zaber’s Gantry Configurators to customize your travel limits, payload capacity, and frame style. Once you have designed your system and received your kit, follow the detailed instructions in the user manual to complete the mechanical build:
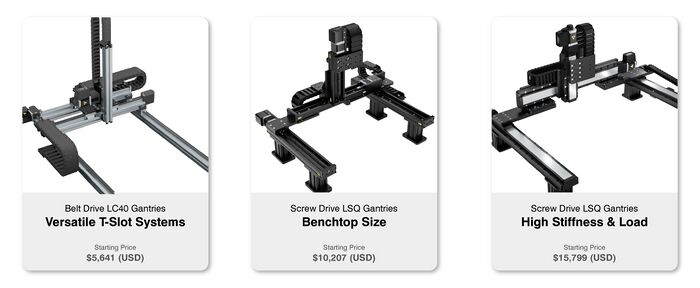
- Belt-Drive LC40 Gantry Configurator: Modular T-slot frame for light payloads, up to 3 m of travel. See manual.
- Screw Drive LSQ Gantry Configurator: Medium payloads, high repeatability up to 600 mm of travel. See manual.
- Screw Drive LRT Gantry Configurator: High stiffness and payloads up to 1.5 m of travel. See manual.
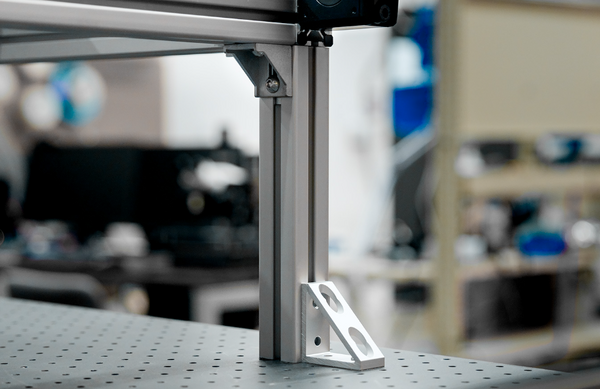
2. Build a Raised Frame
The LSQ and LRT gantries include optional risers up to 500 mm, whereas the LC40 gantries don’t have standard options since their modular platform integrates seamlessly with most 40 mm extrusion framing systems. Consequently, if your application requires significant vertical travel, constructing the frame from off-the-shelf, T-slot aluminum extrusion ensures smooth integration with the LC40’s built-in rails.
For heavy payloads or high-acceleration movements, we recommend securing the gantry risers or frame to a rigid base, such as an optical breadboard. Standard T-slot hardware can be used to assemble a structure for an LC40 gantry and anchor it firmly.
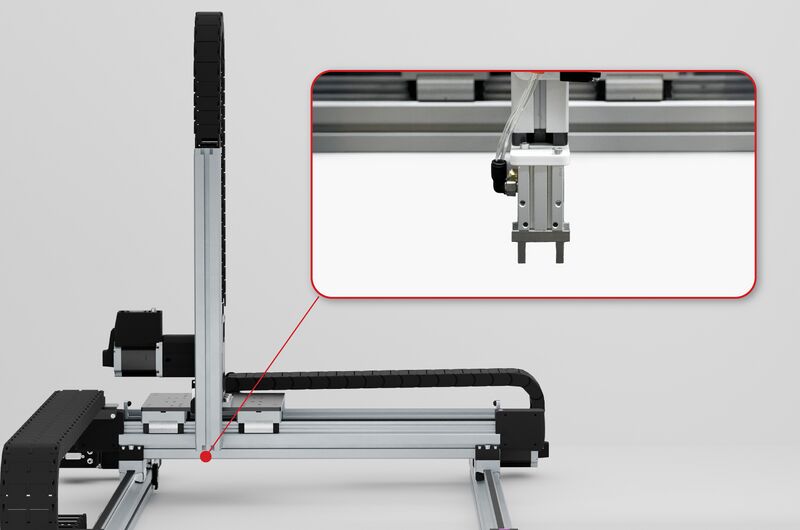
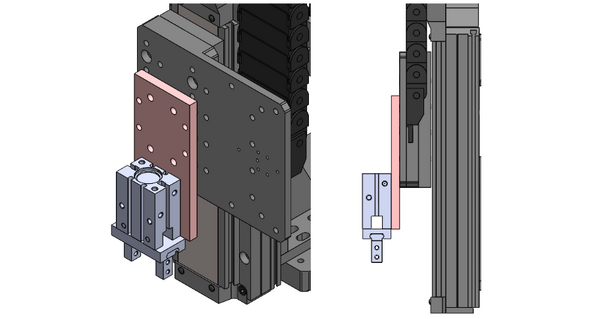
3. Mount the Gripper
Mounting options for a gripper depends on which Zaber Z-axis stage you are mounting the gripper to. While most grippers facilitate top-mounting, several also offer side-mounting configurations.
The LC40 cantilever Z-axis provides the most versatility, featuring a T-slot extrusion for flexible vertical positioning and a machined end cap with tapped holes.
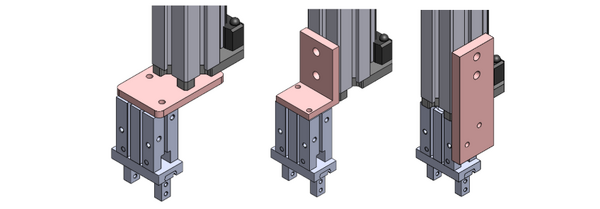
In contrast, the LRT and LSQ stages only support mounting perpendicular to the stage face; as a result, these models require a custom angle bracket or a vertical flat plate to properly orient the gripper for pick-and-place tasks. The LRT and LSQ mounting is more limited, as the gripper must be mounted to a moving stage. The offset distance between the gripper and the stage limits the size of objects that can be gripped.
4. Add Fittings to the Solenoid Valve
Thread a straight or elbow push-to-connect fitting to the “P”, “A” and “B” port of the solenoid valve. Thread silencer fittings to the “R” and “S” ports of the solenoid valve. Thread meter-in or meter-out flow control valves to the gripper ports.
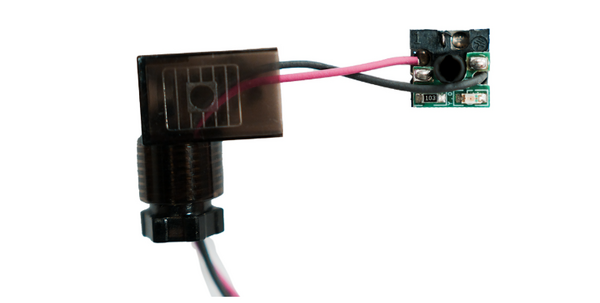
5. Wire and Mount the Solenoid Valve
To wire the solenoid, the plug must first be removed as shown in the diagram. Secure the connections to terminals 1 and 2 by tightening the terminal screws inside the solenoid. It is also recommended to add crimps to the other end of the wire that will interface with the X-SCA4 terminal block. Do not connect the solenoid wires to the X-SCA4 terminal block before configuring it in step 7.
Fixed Valve Setup: One mounting option is to secure the directional control valve to a stationary structure, such as an optical breadboard. While this configuration simplifies the wiring, it can introduce a noticeable lag in gripper actuation. This delay occurs because the air must travel through the entire length of tubing between the valve and the gripper before actuation begins. Using rough approximations, a 100-foot run of ¼” tubing results in a lag of approximately 50 ms. In high-speed applications, any distance exceeding this could significantly impact cycle efficiency.
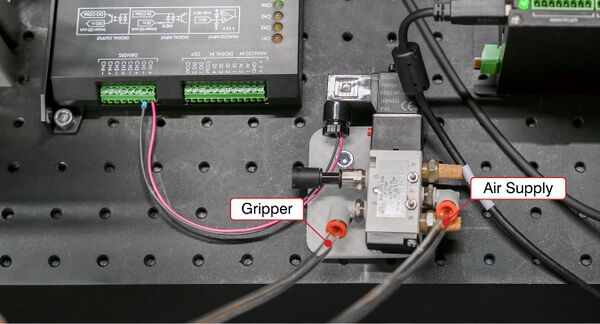
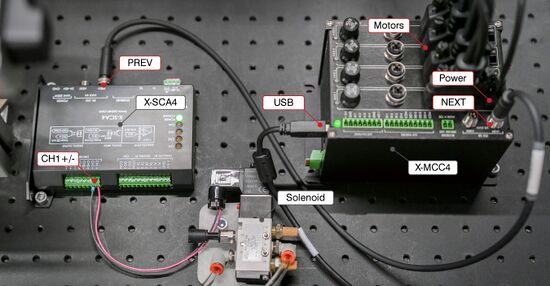
Figure 9: Solenoid to X-SCA4 wiring and optical breadboard mounting. Do not connect the solenoid to the X-SCA4 until step 7.
On-Tool Valve Setup: An alternative option is to mount the directional control valve directly onto the Z-axis stage alongside the gripper. Although this requires longer electrical leads to be routed through the cable guides, it ensures faster actuation times by minimizing the distance the air must travel.
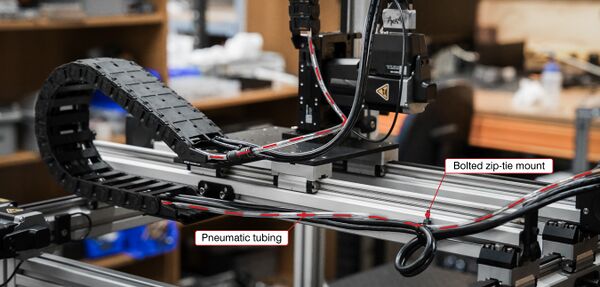
6. Route and Connect Pneumatic Tubing
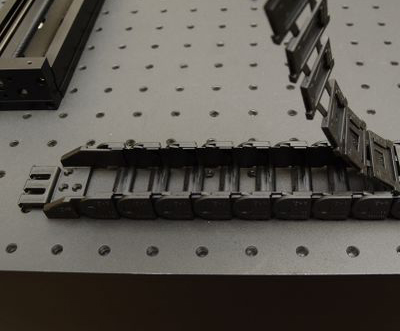
Once the primary pneumatic components are installed, the tubing can be routed through the cable guides to the gripper. To simplify this process, it helps to straighten the cable guide before feeding the tubing through; alternatively, the guides can be peeled open to allow for direct placement.
After the tubing has been cut to the appropriate length to reach the valve and gripper, perform a final inspection for the following issues:
- Avoid Twisting: Ensure that tubing and cables are not twisted within the cable guides. Overlapping or twisted lines experience increased friction and will wear out prematurely.
- Relieve Fitting Strain: Verify that the tubing is not bending or "side-loading" at the push-to-connect fittings. Secure the lines at each end of the cable guide using zip-ties attached to adhesive-backed mounts or T-slot compatible hardware.
- Verify Range of Motion: Manually move the gantry through its full range of travel to check for excessive tension. It is best practice to leave a small amount of slack in both the tubing and cables to prevent binding at the travel limits.
Assuming the facility has an existing air supply, the next step is to install a fitting to that line and route the air to the gantry. This supply line should be connected to the "P" (Pressure) port on the solenoid valve.
The remaining port configuration depends on the type of actuator being used:
- For Single-Acting Cylinders: Install a plug in the "A" port and connect the gripper to the "B" port.
- For Double-Acting Cylinders: Connect the gripper to the "A" and "B" ports of the solenoid.
7. Connect, Configure, and Validate Functionality
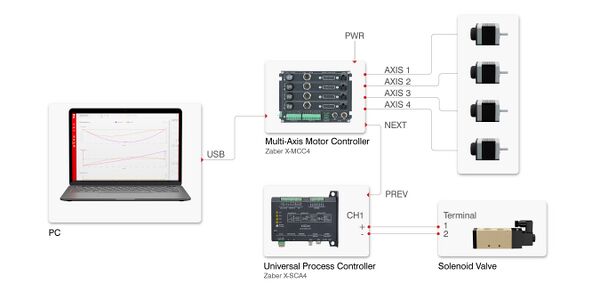
Before applying power to your controller, such as the X-MCC, establish a communication link by daisy-chaining from the "Next" connector on the X-MCC to the "Prev" connector on the X-SCA4. Once the hardware is securely interfaced, connect your controller to a PC and connect the power supply to the controller to begin configuration.
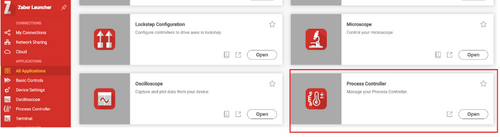
To configure the settings for the solenoid valve you can use Zaber Launcher. First, navigate to the Process Controller application. Here, you can set the steady voltage, maximum current, and initial pulse voltage.
The valve used in this build operates at 24 VDC and consumes up to 2.5 W. While the Steady Voltage can be set to 24 V, the Maximum Current must be high enough to accommodate the valve's rated power consumption. Based on the datasheet (2.5 W / 24 V), the valve draws approximately 104 mA. Additionally, to account for inrush current, the Initial Pulse Voltage can be set higher than 24V, this will send an initial pulse of power when the device is turned on. The valve datasheet or label on the housing itself should indicate its maximum voltage, set the Initial Pulse Voltage to that value. If the datasheet does not list a maximum voltage, set it to the same value as the Steady Voltage.
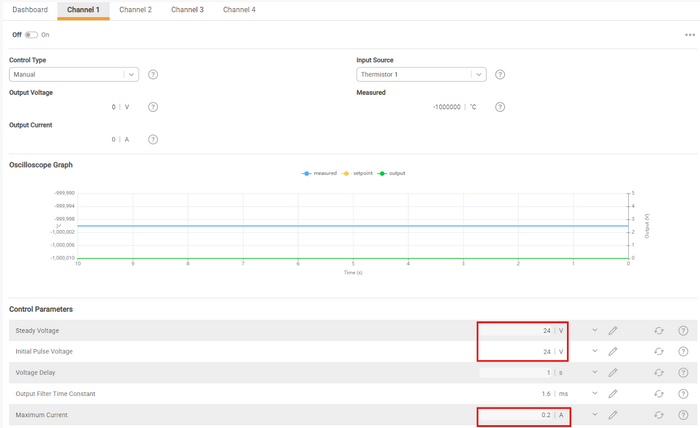
Figure 15: Setting initial pulse voltage and max current in X-SCA4 Process 1 settings in Process Controller application.
Next, navigate to the Dashboard tab of the Process Controller app and ensure the desired channel on the process controller is powered off. Wire the solenoid valve to the +/- channel pins on the terminal block of the X-SCA. To ensure correct polarity for the DC signal, connect Terminal 1 (DC+) of the solenoid to CH1+ and Terminal 2 to CH1-.
Once the solenoid is securely wired to the controller, navigate back to the Process Controller app and toggle power for that channel. If the wiring and pneumatic lines are correctly installed, the gripper should actuate.
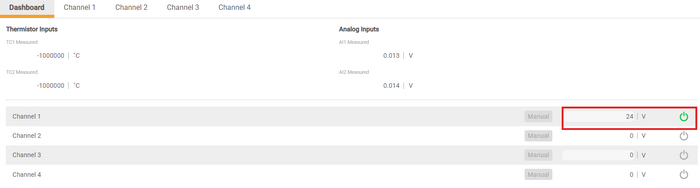
Figure 16: Turning on process 1 to power solenoid valve in Process Controller application.
8. System Automation: Programming Workflows with Zaber Motion Library
To wrap up the technical integration, the final stage is automation. Once the hardware functionality is verified, the gantry and gripper can be programmed for a pick-and-place operation using our Zaber Motion Library (ZML).
The following Python script demonstrates how to connect to the X-SCA4 controller and command it to supply 24 V to its first output channel. When the solenoid valve is correctly interfaced, executing this script will trigger the gripper to actuate.
from zaber_motion.product import ProcessController
from zaber_motion.product import ProcessControllerMode
from zaber_motion.ascii import Connection
# Connects to the X-SCA4 controller
connection = Connection.open_serial_port('COM7')
device = connection.get_device(1)
controller = ProcessController(device)
# Check that the controller is connected
if ProcessController.detect(connection, identify= True):
    print("Process controller detected")
# Create the process for driving the solenoid's voltage
process = controller.get_process(1)
process.enable(enabled=True)
process.set_mode(ProcessControllerMode.MANUAL)
device.settings.set("process.voltage.on", 24)
# Turn on the process, i.e. power the solenoid
process.on()
With the solenoid control verified, you can now incorporate these commands into a comprehensive program that coordinates your gantry’s position with pneumatic actuation.
When programming the sequence, it is vital to account for the physical latency of the pneumatic system. After the controller triggers the solenoid to pick up an object, the script should include a brief pause (dwell time) before initiating the next move. This delay ensures the gripper has fully engaged the payload before the Z-axis begins to lift the part, for example. Without this pause, the gantry might move upward before the clamping force is fully established, potentially leading to dropped parts or mechanical interference.
The following script demonstrates a basic sequence: moving the Z-axis to the pick position, activating the gripper, pausing for mechanical engagement, and then retracting the Z-axis.
z_axis.move_absolute(200, Units.LENGTH_MILLIMETRES)
# Turn on solenoid valve. Gripper will close
process.on()
# Pause for 0.5 seconds
time.sleep(0.5)
z_axis.move_absolute(100, Units.LENGTH_MILLIMETRES)
Further Improvements
Detecting Successful Grips
Unlike electric grippers, which offer native force and position feedback, pneumatic grippers require external sensors to confirm a successful grip. These sensors can be integrated in several ways depending on whether you need to detect the object itself or the mechanical state of the gripper.
Direct Object Detection
One approach is to detect the payload directly using proximity sensors mounted to the gripper fingers.
- Contact Sensors: A simple limit switch mounted to a finger provides a clear digital signal once the object is physically engaged.
- Non-Contact Sensors: Inductive, magnetic, photoelectric, or ultrasonic sensors offer a "touchless" alternative. The choice depends on the material of the object and the required detection distance.
- Integration Logic: If the sensor detects the object directly, it typically provides a discrete signal to the X-MCC’s digital I/O. If the sensor is used to measure a varying distance (analog position), it should be routed to the controller’s analog input.
Indirect Detection: Piston Position Sensing
A more streamlined method involves monitoring the internal state of the gripper rather than the object itself. Many industrial grippers, such as those from the NITRA line, feature an internal magnet embedded in the piston.
- Magnetic Sensors: Small reed or solid-state switches can be slid into slots on the gripper body. By positioning the sensor at the specific point where the piston stops when an object is present, you can generate a "part-present" signal.
- Controller Interface: These sensors integrate easily with the digital I/O terminal blocks of the X-MCC or X-SCA4.

Part Detection Station
Another approach is to have a part detection station that the gantry passes the part through. Non-contact and contact sensors could be integrated into these stations instead of being mounted directly to the gripper. Many automated processes have these stations built in to detect failed operations. A stationary system has the advantage of not reducing the payload capacity. Additionally, the station can have a larger form factor and be wired more easily.
Rotating Wrist
In many automated systems, the end effector includes a rotating wrist in addition to the gripper. This addition provides an extra degree of freedom, allowing the payload to be oriented as needed. This capability is particularly beneficial for high-efficiency handling of round objects, such as test tubes, bottles or bar stock, which may require specific alignment during pick-and-place tasks.
However, integrating a rotating wrist with a pneumatic system presents a unique plumbing challenge: the air lines must remain connected while the wrist rotates. To solve this, a rotary union (or rotary joint) is required. This specialized mechanical coupling allows compressed air to flow from a stationary inlet to a rotating outlet without leaking or tangling the tubing. Without a rotary union, the air lines would twist and eventually fail as the wrist rotates through its range of motion.
Summary
Combining a pneumatic gripper with a Zaber gantry system makes for a highly efficient, cost-effective solution for automated pick-and-place tasks. By pairing Zaber’s customizable travel and precision with the high-force versatility of pneumatics, you can build a system tailored to your specific throughput needs. Using the X-SCA4 controller to bridge these technologies eliminates technical friction allowing you to program the full pneumatic and motion workflow within the user-friendly Zaber ecosystem.
Appendix
Bill of Materials (Pricing as of February 2026)
| Source | Item | Description | Qty | Price/unit (USD) | Subtotal (USD) |
|---|---|---|---|---|---|
| Zaber | 400mm x 400mm x 200mm Gantry | LC40 XYZ Gantry | 1 | $15,259.00 | $15,259.00 |
| Zaber | Solenoid driver | X-SCA4 | 1 | $726.00 | $726.00 |
| AutomationDirect | Gripper | KP16MSA-MB | 1 | $269.00 | $269.00 |
| AutomationDirect | Gripper fittings | ME4M-M5 | 1 | $11.00 | $11.00 |
| AutomationDirect | Pneumatic tubing | PU14CLR100 | 1 | $32.00 | $32.00 |
| AutomationDirect | Solenoid valve | AVS-5111-24D | 1 | $36.50 | $36.50 |
| AutomationDirect | Meter-in valve | FVR4M-M5 | 1 | $18.50 | $18.50 |
| AutomationDirect | Exhaust silencer | SBC-18N | 1 | $3.50 | $3.50 |
| AutomationDirect | Plug | BFHHP-18N | 1 | $4.25 | $4.25 |
| AutomationDirect | Solenoid Fittings | ME14-18N | 1 | $10.50 | $10.50 |
| 80/20 | 200 mm T-Slot Aluminum Extrusion | 40-4040 | 4 | $11.10 | $44.40 |
| 80/20 | 620 mm T-Slot Extrusion | 40-4040 | 2 | $28.11 | $56.22 |
| 80/20 | T-nuts | 13031 | 25 | $2.58 | $64.50 |
| 80/20 | M6 x 12.00 mm SHCS | 3801 | 25 | $0.38 | $9.50 |
| 80/20 | Corner gusset brackets | 14206 | 10 | $4.89 | $48.90 |
| Amazon | Air compressor | 1 | $161.23 | $161.23 | |
| Amazon | Cable tie mounts | 1 | $10.50 | $10.50 | |
| Custom | Gripper mount | N/A | N/A | N/A | N/A |
| Custom | Solenoid mount | N/A | N/A | N/A | N/A |
| Total | $16,765.50 | ||||
Note: Prices in this bill of materials are accuracte as of publication and may change.