HL04 Series User's Manual
Nucleus® HL04 Laser Autofocus Sensor

Disclaimer
Zaber’s products are not intended for use in any critical medical, aviation, or military applications or situations where a product's use or failure could cause personal injury, death, or damage to property. Zaber disclaims any warranty of fitness for a particular purpose. The user of this product agrees to Zaber's general terms and conditions of sale.
Precautions
 Class 1M Laser Hazard! This device contains a class 1M laser and emits an invisible laser @785 nm. The laser is always on when the autofocus is powered.
The laser is unsafe when viewed through magnifying optics. Remove the objective lens and replace it with a cover when working on the microscope. Do not look down into the focused beam. Turn off the autofocus when it is not required.
Class 1M Laser Hazard! This device contains a class 1M laser and emits an invisible laser @785 nm. The laser is always on when the autofocus is powered.
The laser is unsafe when viewed through magnifying optics. Remove the objective lens and replace it with a cover when working on the microscope. Do not look down into the focused beam. Turn off the autofocus when it is not required.
Heavy! Completely assembled MVR microscopes can weigh more than 18 kg/40 lb. Exercise caution when lifting/moving larger assemblies.
 Important: Many Components/Assemblies within the microscope must remain dust and fingerprint-free inside to prevent issues with image quality. Use gloves when handling optics (mirrors, lens, prisms, filters). Use air duster cannisters or bulb blowers to remove dust or lint from optics where necessary. Retain covers and caps for re-use to cover openings to microscope components.
Setup
Hardware Setup
Open Zaber Launcher, and select the microscope app
-
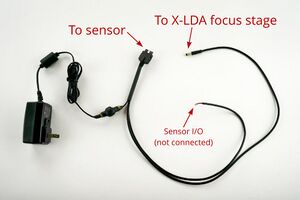
Locate the supplied autofocus IO and power cable assembly†
-
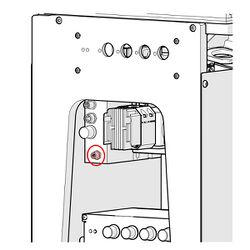
Connect the black M5 IO cable to the IO port on the X-LDA Focus Stage.
-
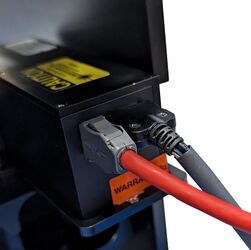
Connect the Black power and IO cable to the autofocus sensor then connect red Ethernet cable to the autofocus sensor and to a free ethernet port on your host system.
-
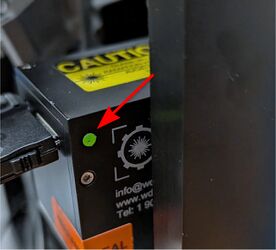
Plug in the power supply. When the status LED turns flashing green, the sensor is ready to connect.
† If alternate Ethernet or power supply cables are used with the HL04, they should not exceed 3m in length.
Software Setup
-
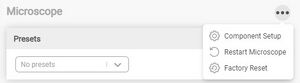
Open Zaber Launcher, and select the Microscope App from the All Apps tab. Open the component setup panel to assign the desired functions of your system to the modules you have installed. Many different microscope configurations are possible. Assigning functions to specific modules, enables a seamless experience with Zaber Launcher GUI and the Zaber Motion Library API.
-
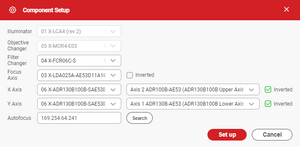
Click the Search button to automatically find and enter the address of the autofocus sensor, then click Set Up
-

Click the Initialize button to home all motion axes.
-
Several autofocus settings are magnification-specific. To set these parameters, open the autofocus settings panel.
-
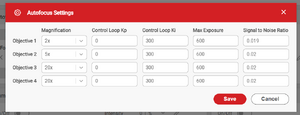
Enter the magnification of each of your objectives using the drop down menu. Select the closest magnification to that of your objective. It is OK if the selected magnification does not match perfectly. Please contact Zaber support for more detailed guidance before adjusting control loop parameters, or AF sensor exposure or SNR settings.
-
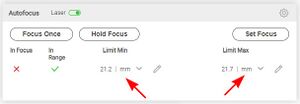
Limit Min and Limit Max set the range which the autofocus will operate within. Appropriately set, these limits will maximize the autofocus speed while preventing the objective from colliding with the sample. Nikon, Zeiss and Olympus objectives belonging to the same series should have common parfocal distances. Correctly set limits will prevent collision even when switching between different objectives. Set the maximum focus limit by slowly moving the objective just beyond the expected focal plane of your sample. Take care not to crash your objective into your sample! Copy the position of the focus stage from the position panel and input that into the Limit Max field.
Operation

Zaber Launcher autofocus control panel
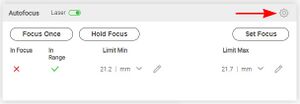
Before using the autofocus, you must manually focus the system once. When the system has been satisfactorily focused, click the Set Focus button. This will set the offset between the reference surface the sensor detects and the position focal plane. When the system is in focus, the In Focus status should report a ✓.
As long as the In Range status is showing a should report a ✓, clicking the Focus Once button will refocus the system by finding the reference surface and applying the previously set offset to the desired focal plane.
Clicking the Hold Focus button will activate the focus control loop until the Cancel button is clicked. This mode will hold the sample in focus as the stage is panned around. It will also actively compensate for thermal drift for long duration protocols. While in this mode the maximum XY movement speed will be limited to prevent the sample being moved faster than the sensor can keep up with.
The 785nm laser can be switched on and off as required using the Laser switch.
Troubleshooting
If the system is not able to perform the Focus Once or Hold Focus actions, check that the In Range status is a ✓. If the sensor is not in range. The sensor requires the objective to be within 10 depths-of-field of the reference surface to detect a return signal that is sufficient to accurately focus the microscope. If it is beyond this distance, the In Range status will display an X. Focus the system manually and perform the Set Focus operation.
Out of range errors may occur if you reach one of the autofocus range limits. Check Limit Min and Limit Max to ensure they are sufficient to enable proper focus at all points. Check that your sample is not tilted. Check that the sample and the sample holder insert are correctly seated and leveled.
The sensor requires the objective to be within 10 depths-of-field of the reference surface to detect a return signal that is sufficient to accurately focus the microscope. During normal operation, the scanning speed will be reduced to keep the reference surface in range. However, a sudden large discontinuity in the surface of your slide or imaging vessel may result in an out of range condition. Try moving more slowly across the discontinuity, or cancel focus hold mode prior to moving across the discontinuity, and resume the focus hold mode on the other side of it.
Microscope Module Product Manuals
Nucleus Inverted Microscopes
For complete documentation on the assembly and operation of Nucleus inverted microscopes, please refer to the Inverted microscope manual
Nucleus Upright Microscopes
For complete documentation on the assembly and operation of Nucleus upright microscopes, please refer to the Upright microscope manual
Warranty and Repair
For Zaber's policies on warranty and repair, please refer to the Ordering Policies.
Standard products
Standard products are any part numbers that do not contain the suffix ENG followed by a 4 digit number. Most, but not all, standard products are listed for sale on our website. All standard Zaber products are backed by a one-month satisfaction guarantee. If you are not satisfied with your purchase, we will refund your payment minus any shipping charges. Goods must be in brand new saleable condition with no marks. Zaber products are guaranteed for one year. During this period Zaber will repair any products with faults due to manufacturing defects, free of charge.
Custom products
Custom products are any part numbers containing the suffix ENG followed by a 4 digit number. Each of these products has been designed for a custom application for a particular customer. Custom products are guaranteed for one year, unless explicitly stated otherwise. During this period Zaber will repair any products with faults due to manufacturing defects, free of charge.
How to return products
Customers with devices in need of return or repair should contact Zaber to obtain an RMA form which must be filled out and sent back to us to receive an RMA number. The RMA form contains instructions for packing and returning the device. The specified RMA number must be included on the shipment to ensure timely processing.
Email Updates
If you would like to receive our periodic email newsletter including product updates and promotions.
Contact Information
Contact Zaber Technologies Inc by any of the following methods:
| Phone | 1-604-569-3780 (direct) 1-888-276-8033 (toll free in North America) |
|---|---|
| Fax | 1-604-648-8033 |
| #2 - 605 West Kent Ave. N., Vancouver, British Columbia, Canada, V6P 6T7 | |
| Web | www.zaber.com |
| Please visit our website for up to date email contact information. |
The original instructions for this product are available at https://www.zaber.com/manuals/HL04.
Product Drawing
Specifications
| Specification | Value | Alternate Unit |
|---|---|---|
| Communication Interface | Ethernet, Analog Voltage Output | |
| Power Supply | 10.8 - 26.4 VDC | |
| Operating Temperature Range | 20 to 30 °C | |
| CE Compliant | Yes | |
| Focus Sensor Repeatability | 450 nm | |
| Focus Time | 250 - 450 ms | |
| Laser Wavelength | 785 nm | |
| Optical Notch Filter Stop Band Width | 25 nm | |
| Optical Notch Filter Wavelength | 785 nm | |
| Weight | 0.8 kg | 1.764 lb |
Charts and Notes
Long duration compensation for thermal drift on a Nucleus® microscope.
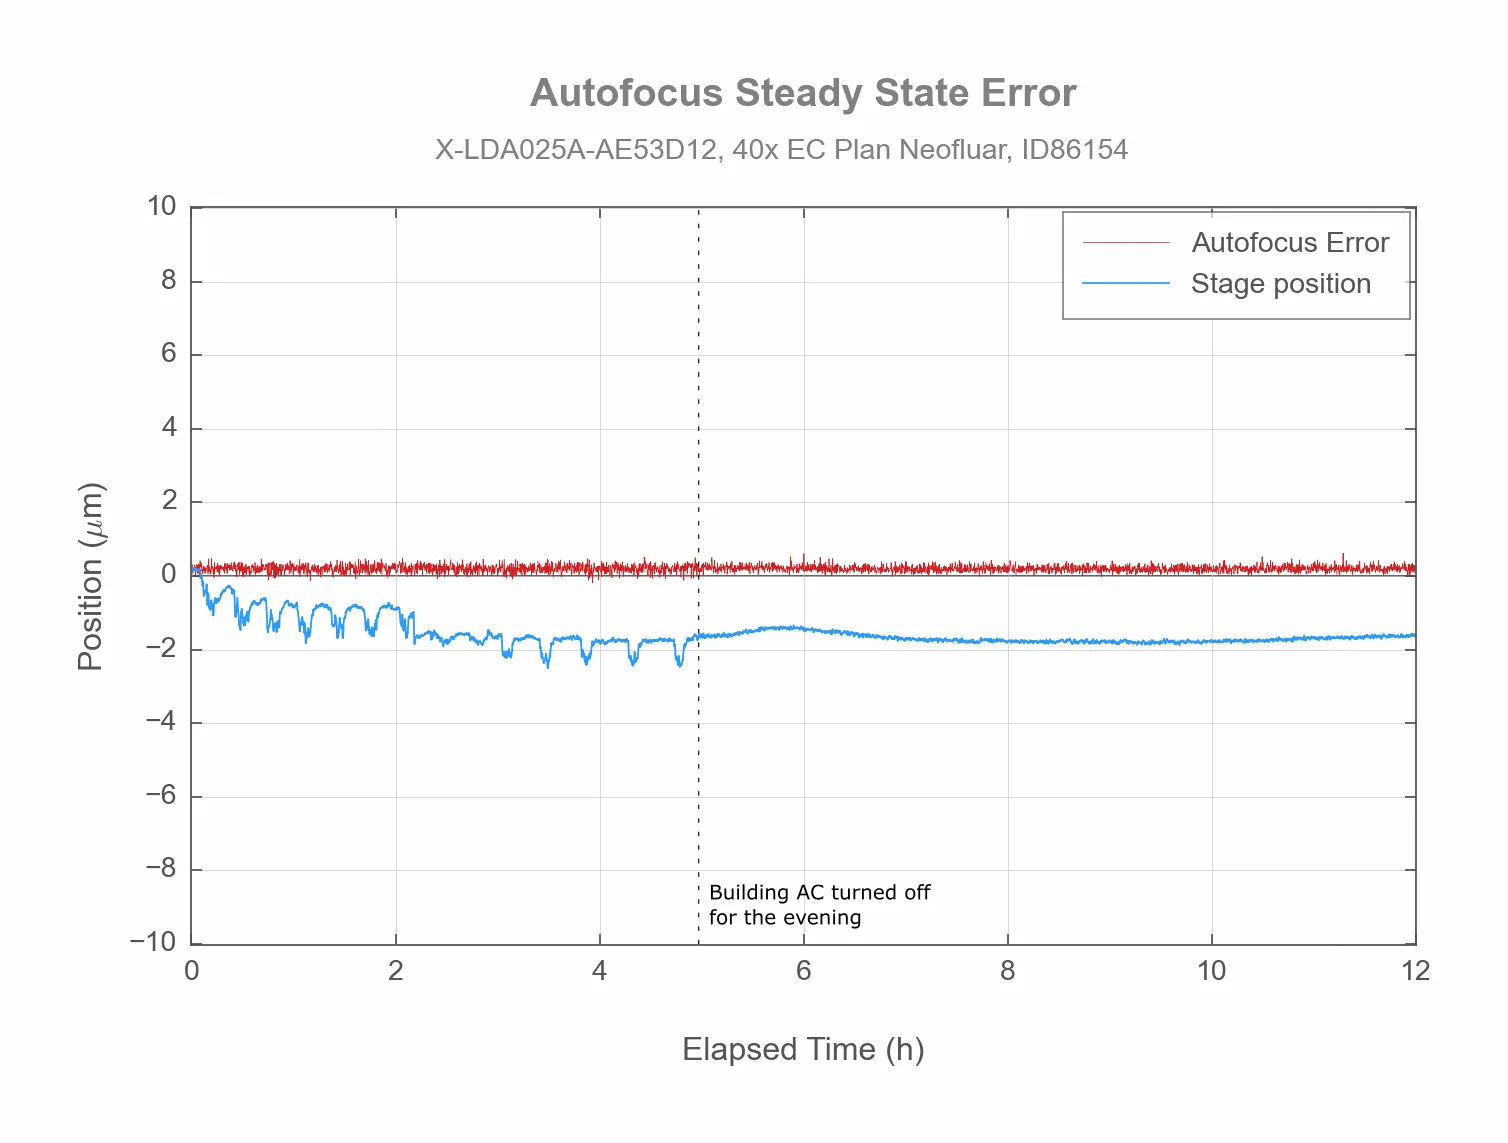
A Nucleus® microscope equipped with an HL04 laser autofocus module can effectively maintain focus despite thermal drift induced by changes in ambient temperature. The blue line tracks the position of the focus stage as it actively compensates for thermal drift caused by the air conditioning.
Transmission plot of 785 nm notch filter pre-installed in MJB25C-F1
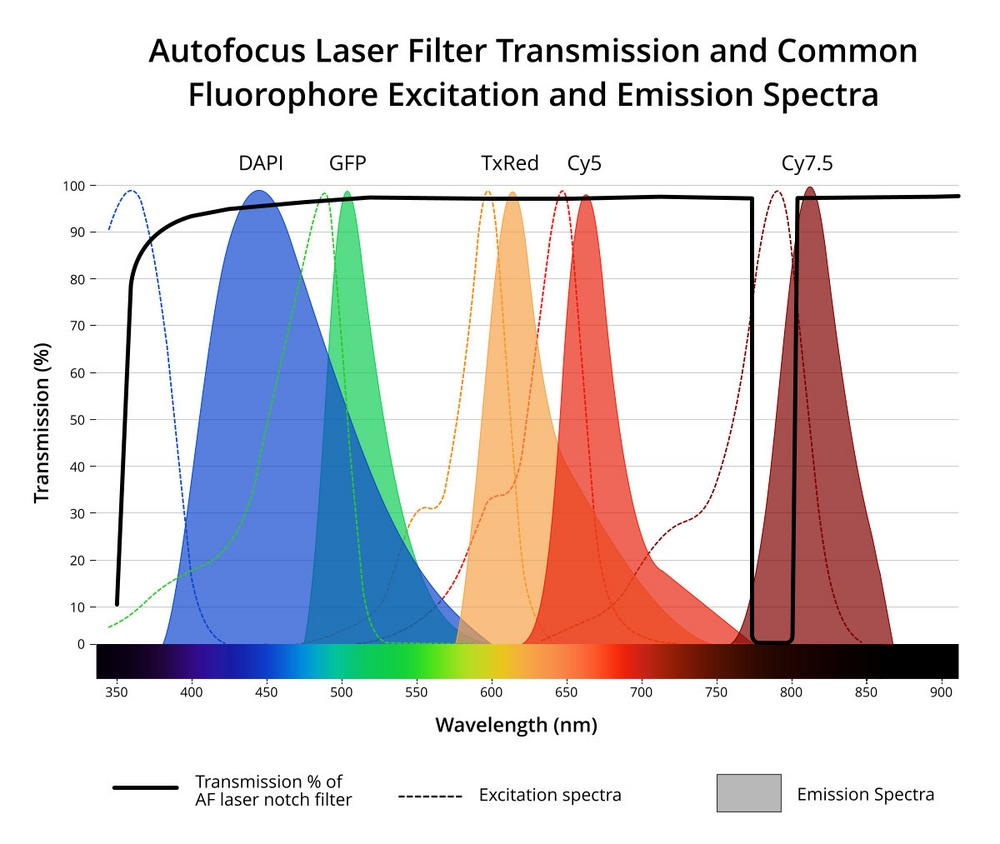
Transmission plot of 785 nm notch filter pre-installed in the required MJB25C-F1 junction block. The notch filter will block key wavelengths for the Cy7 fluorophore, so Cy7.5 should be used instead.
Product Change Notices
Click here to view the current product change notices and subscribe to future change notifications.
This product uses the FreeRTOS kernel. FreeRTOS is © 2026 Amazon.com, Inc. or its affiliates and is governed by the following license:
All rights reserved.
Permission is hereby granted, free of charge, to any person obtaining a copy of this software and associated documentation files (the "Software"), to deal in the Software without restriction, including without limitation the rights to use, copy, modify, merge, publish, distribute, sublicense, and/or sell copies of the Software, and to permit persons to whom the Software is furnished to do so, subject to the following conditions:
The above copyright notice and this permission notice shall be included in all copies or substantial portions of the Software.
THE SOFTWARE IS PROVIDED "AS IS", WITHOUT WARRANTY OF ANY KIND, EXPRESS OR IMPLIED, INCLUDING BUT NOT LIMITED TO THE WARRANTIES OF MERCHANTABILITY, FITNESS FOR A PARTICULAR PURPOSE AND NONINFRINGEMENT.
IN NO EVENT SHALL THE AUTHORS OR COPYRIGHT HOLDERS BE LIABLE FOR ANY CLAIM, DAMAGES OR OTHER LIABILITY, WHETHER IN AN ACTION OF CONTRACT, TORT OR OTHERWISE, ARISING FROM, OUT OF OR IN CONNECTION WITH THE SOFTWARE OR THE USE OR OTHER DEALINGS IN THE SOFTWARE.
This product uses the LZ4 compression library. LZ4 is © 2011–2016 Yann Collet and is governed by the following license:
All rights reserved.
Redistribution and use in source and binary forms, with or without modification, are permitted provided that the following conditions are met:
- Redistributions of source code must retain the above copyright notice, this list of conditions and the following disclaimer.
- Redistributions in binary form must reproduce the above copyright notice, this list of conditions and the following disclaimer in the documentation and/or other materials provided with the distribution.
THIS SOFTWARE IS PROVIDED BY THE COPYRIGHT HOLDERS AND CONTRIBUTORS "AS IS" AND ANY EXPRESS OR IMPLIED WARRANTIES, INCLUDING, BUT NOT LIMITED TO, THE IMPLIED WARRANTIES OF MERCHANTABILITY AND FITNESS FOR A PARTICULAR PURPOSE ARE DISCLAIMED. IN NO EVENT SHALL THE COPYRIGHT HOLDER OR CONTRIBUTORS BE LIABLE FOR ANY DIRECT, INDIRECT, INCIDENTAL, SPECIAL, EXEMPLARY, OR CONSEQUENTIAL DAMAGES (INCLUDING, BUT NOT LIMITED TO, PROCUREMENT OF SUBSTITUTE GOODS OR SERVICES; LOSS OF USE, DATA, OR PROFITS; OR BUSINESS INTERRUPTION) HOWEVER CAUSED AND ON ANY THEORY OF LIABILITY, WHETHER IN CONTRACT, STRICT LIABILITY, OR TORT (INCLUDING NEGLIGENCE OR OTHERWISE) ARISING IN ANY WAY OUT OF THE USE OF THIS SOFTWARE, EVEN IF ADVISED OF THE POSSIBILITY OF SUCH DAMAGE.