X-G-RST-E Series User's Manual
High load motorized gimbals with built-in controllers and motor encoders
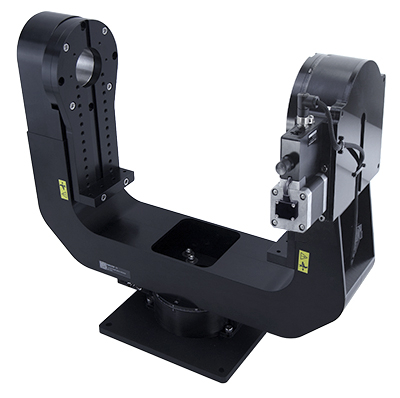
Table of Contents
Table of Contents
Disclaimer
Zaber’s products are not intended for use in any critical medical, aviation, or military applications or situations where a product's use or failure could cause personal injury, death, or damage to property. Zaber disclaims any warranty of fitness for a particular purpose. The user of this product agrees to Zaber's general terms and conditions of sale.
Precautions
 Heavy! Completely assembled X-G-RST-E Gimbals with crossmember plates for mounting the payload can weigh more than 15kg/33lb. Exercise caution when lifting/moving larger assemblies.
Tipping Hazard! Before mounting a payload or powering up the gimbal, ensure it is fully secured to a mounting surface. Moving the payload can cause unsecured gimbals to tip over, which may lead to injury or damage.
Pinch Hazard! Keep fingers and any loose objects (such as dangling cables) away from the elevation mounts whenever the device is moving or active as pinching could cause severe injury or cable damage.
 Important: Zaber's X-G-RST-E gimbals use X-RST-E rotary stages, which are capable of outputting high torque and supporting heavy centred loads. It is possible to damage the stage or reduce its lifetime under certain conditions within the limits of the torque and load ratings. Maximum angular momentum is also specified for this product to reduce the likelihood of shortened lifetime due to abrupt starts or stops of significant inertial loads.
The distance of the payload crossmember plate to the elevation axis is adjustable. With increasing offset from the axis it is highly recommended to center the load with the elevation axis to achieve optimal gimbal performance and long lifetime.
Important: Zaber's X-G-RST-E gimbals use X-RST-E rotary stages, which are capable of outputting high torque and supporting heavy centred loads. It is possible to damage the stage or reduce its lifetime under certain conditions within the limits of the torque and load ratings. Maximum angular momentum is also specified for this product to reduce the likelihood of shortened lifetime due to abrupt starts or stops of significant inertial loads.
The distance of the payload crossmember plate to the elevation axis is adjustable. With increasing offset from the axis it is highly recommended to center the load with the elevation axis to achieve optimal gimbal performance and long lifetime.
Please see Crossmember Height Adjustment instructions for details.
Important: When Adjusting the crossmember plate height, always ensure the crossmember plate feet fasteners are tight before engaging elevation axis apparatus.
Regularly checking fasteners are tight is advised as small vibrations during gimbal operation can lead to loosening. Low-strength threadlocker such as Loctite 222 is recommended.
Important: Note there is a unidirectional homing limitation, which can be critical on the elevation axis. The “home” command will always move in the counterclockwise direction towards zero. When power to the system is cycled, the gimbal will need to home in order to re-zero its position. Keep this in mind in the use case requires restricted travel limits, and homing would cause movement through an undesired region.
Please make sure you have enough clearance around the gimbal to allow full 360° rotation of both axes to prevent damage to the surrounding area or your equipment.
Please see Elevation Mount Home Position Angular 45 degree Offset instructions for details.
Important: To ensure cables do not become entangled during gimbal operation, connect power and data cables to only the bottom X-RST-E rotary stage. Power and communication is daisy-chained to the upper X-RST-E rotary stage through a slip ring.
Noise Emissions
The A-weighted emission sound pressure level (SPL) of this device does not exceed 70 dB(A) during intended use.
Included X-G-RST-E Gimbal Items
-
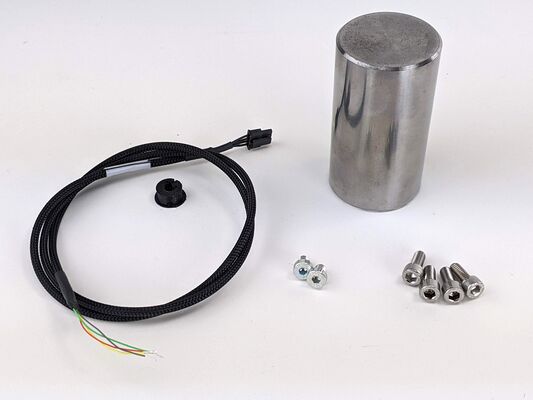
Specific items included with every system
- 1X Optional 4 conductor cable with 2 A signal wire flying leads and a grommet
- 1X Precision 2” alignment pin for optional angular offset realignment of the elevation apparatus with 2X low-profile M6 x 08 mm screws
- 4X M6 x 14 mm screws for bolting gimbal system to a mount surface
Physical Installation and Setup
To set up your gimbal for safe operation, complete the following steps. Contact Zaber Customer Support at any time for clarification or additional information.
-
Before powering up the gimbal secure it to a mount surface via provided 4X M6 screws using 5mm hex key. Max torque specs required 6 N-m.
-

Plug in Power Supply and circular M8 connector from X-USBDC cable into the bottom X-RST-E stage.
-
Connect other side of X-USBDC cable into computer's USB port.
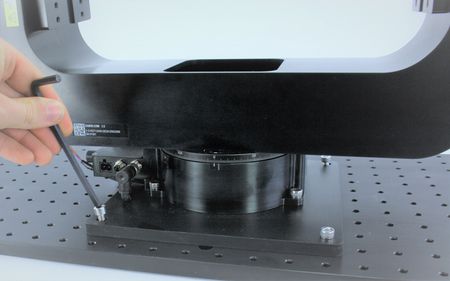
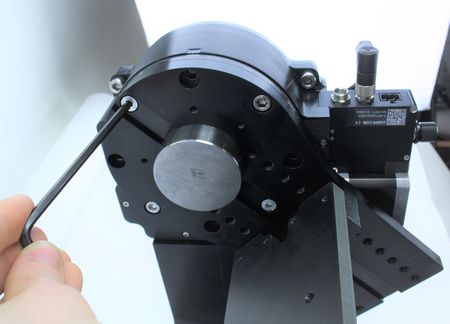
Crossmember Plate Elevation Height Adjustment
To safely adjust the height of the crossmember plate, complete the following steps. Contact Zaber Customer Support at any time for clarification or additional information.
-
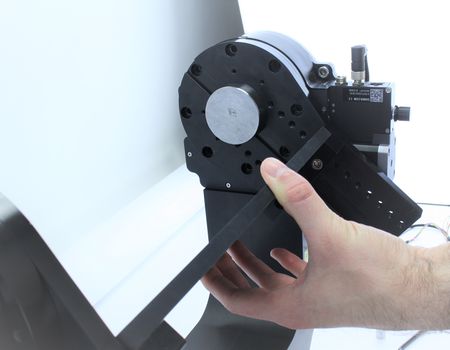
Use a 5 mm hex key to remove four M6 screws on the crossmember plate feet (two on each side)...
-
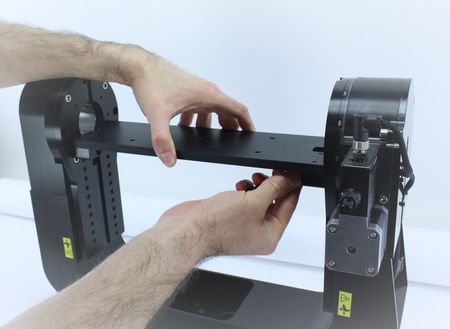
...with one hand while supporting the plate with the other hand.
-
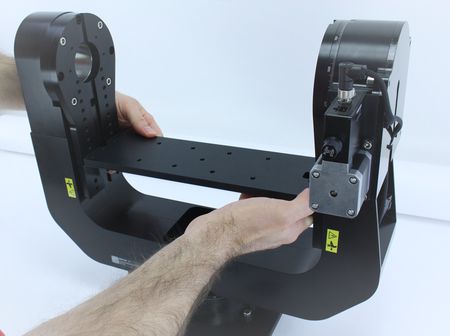
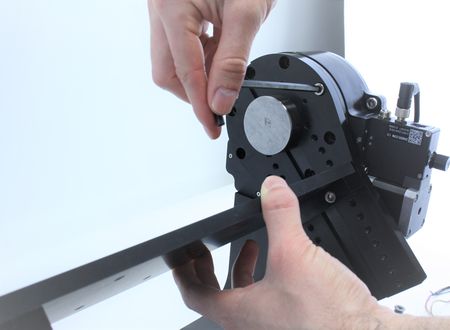
Cautiously, slide the plate with feet down to the desired position. Ensure you keep the plate level as you lower it to avoid any binding.
-
Secure the plate feet by hand tightening them to the elevation mounts.Tip: use foam from packaging as a support or to protect the gimbal arms from damage in case of accidental plate drop. Max torque for these screws is 4.2 N-m
Elevation Mount Home Position Angular 45 degree Offset
To physically offset the elevation mount home position on the gimbal, complete the following steps. Contact Zaber Customer Support at any time for clarification or additional information.
-
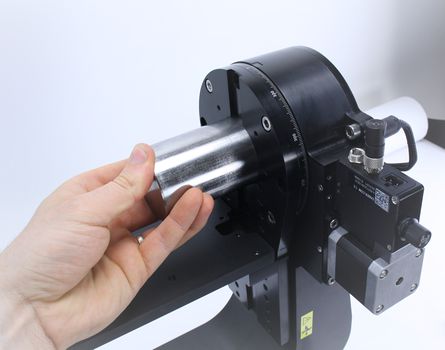
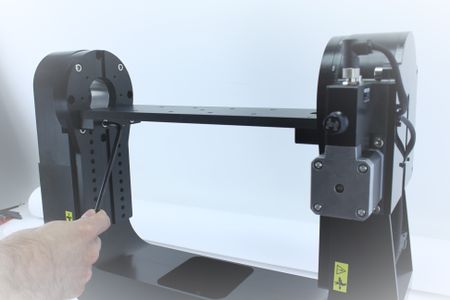
Insert 2” precision alignment pin into the elevation axis stage aperture. You may need to lower the crossmember plate to fully expose the aperture and alternative elevation mount holes.
-
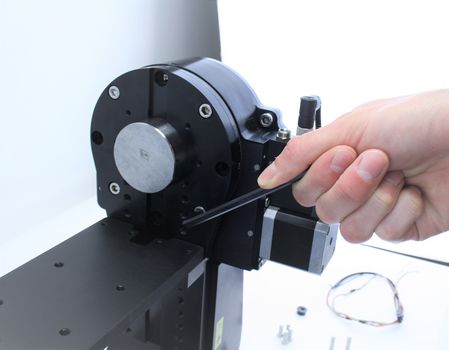
Use a 5 mm hex key to remove the four M6 screws.
-
Once all screws are removed, rotate the mount by 45°.
-
Re-fasten the four M6 screws to re-attach the mount.
-
Ensure you use the two low profile M6 screws inside the key alignment feature to allow the crossmember plate to slide up to or past this height. Note: Max torque for these screws is 4.2 N-m. Carefully, remove the alignment pin from the aperture.
Installation Of Optional Signal Output Cable
Should you decide to use available 4X 2 Amp slip ring wire connections, to properly install the signal output cable complete the following steps. Contact Zaber Customer Support at any time for clarification or additional information.
-
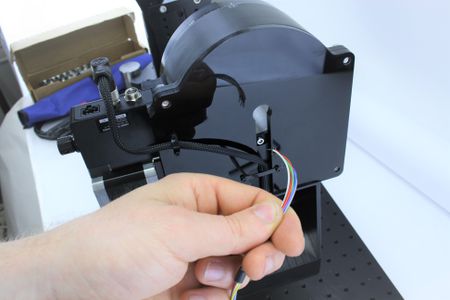
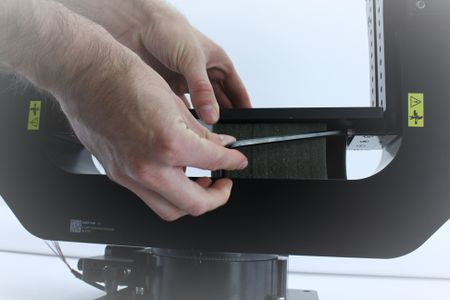
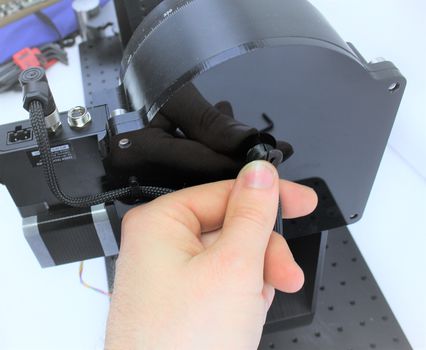
Insert the flying leads of the signal output cable through the back of the hole in the upper axis stage back plate.
-
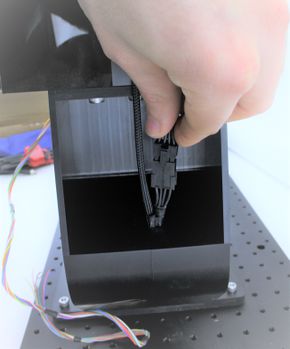
Plug the connector end into the mating connector inside the pocket of the gimbal arm, as shown. The connector should latch securely.
-
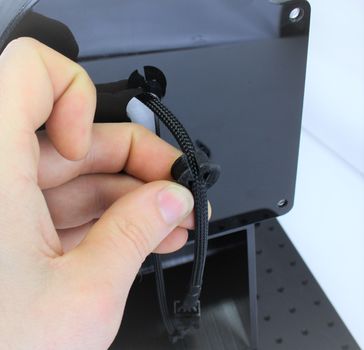
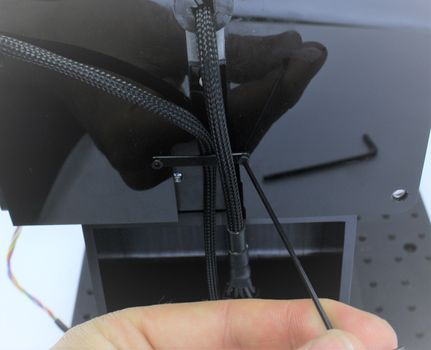
Pull the rubber grommet over the cable with the cutout facing upwards.
-
Press the grommet into the hole of the stage back plate.
-
Use a 1.5 mm hex key to remove the M2 screw on one side of the strain relief strap.
-
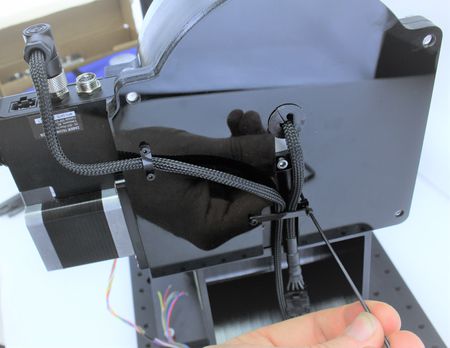
Use the strap to secure the cable and finger tight the M2 screw back..
-
Finished Signal Output Cable Installation.
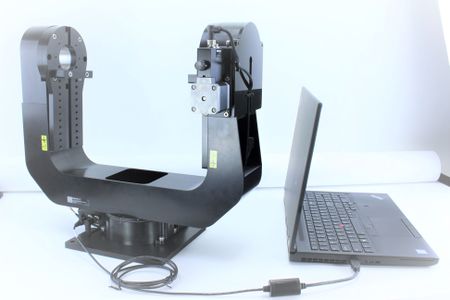
Device Use
- To control the motorized gimbal axes we recommend using Zaber Console.
Motorized Axis Product Manual
The X-G-RST-E gimbals contain two separate X-RST-E rotary stages. Detailed information for controlling these devices, troubleshooting and more, can be found at the link provided below:
Warranty and Repair
For Zaber's policies on warranty and repair, please refer to the Ordering Policies.
Standard products
Standard products are any part numbers that do not contain the suffix ENG followed by a 4 digit number. Most, but not all, standard products are listed for sale on our website. All standard Zaber products are backed by a one-month satisfaction guarantee. If you are not satisfied with your purchase, we will refund your payment minus any shipping charges. Goods must be in brand new saleable condition with no marks. Zaber products are guaranteed for one year. During this period Zaber will repair any products with faults due to manufacturing defects, free of charge.
Custom products
Custom products are any part numbers containing the suffix ENG followed by a 4 digit number. Each of these products has been designed for a custom application for a particular customer. Custom products are guaranteed for one year, unless explicitly stated otherwise. During this period Zaber will repair any products with faults due to manufacturing defects, free of charge.
How to return products
Customers with devices in need of return or repair should contact Zaber to obtain an RMA form which must be filled out and sent back to us to receive an RMA number. The RMA form contains instructions for packing and returning the device. The specified RMA number must be included on the shipment to ensure timely processing.
Email Updates
If you would like to receive our periodic email newsletter including product updates and promotions.
Contact Information
Contact Zaber Technologies Inc by any of the following methods:
| Phone | 1-604-569-3780 (direct) 1-888-276-8033 (toll free in North America) |
|---|---|
| Fax | 1-604-648-8033 |
| #2 - 605 West Kent Ave. N., Vancouver, British Columbia, Canada, V6P 6T7 | |
| Web | www.zaber.com |
| Please visit our website for up to date email contact information. |
The original instructions for this product are available at https://www.zaber.com/manuals/X-G-RST-E.
Appendix A: Default Settings
Please see the Zaber Support Page for default settings for this device.
Specifications
Comparison
| Part Number | Weight | |||
|---|---|---|---|---|
| X-G-RST300-E03SR10 | 13.2 kg (29.101 lb) | |||
| X-G-RST500-E03SR10 | 13.8 kg (30.424 lb) |
This product uses the FreeRTOS kernel. FreeRTOS is © 2026 Amazon.com, Inc. or its affiliates and is governed by the following license:
All rights reserved.
Permission is hereby granted, free of charge, to any person obtaining a copy of this software and associated documentation files (the "Software"), to deal in the Software without restriction, including without limitation the rights to use, copy, modify, merge, publish, distribute, sublicense, and/or sell copies of the Software, and to permit persons to whom the Software is furnished to do so, subject to the following conditions:
The above copyright notice and this permission notice shall be included in all copies or substantial portions of the Software.
THE SOFTWARE IS PROVIDED "AS IS", WITHOUT WARRANTY OF ANY KIND, EXPRESS OR IMPLIED, INCLUDING BUT NOT LIMITED TO THE WARRANTIES OF MERCHANTABILITY, FITNESS FOR A PARTICULAR PURPOSE AND NONINFRINGEMENT. IN NO EVENT SHALL THE AUTHORS OR COPYRIGHT HOLDERS BE LIABLE FOR ANY CLAIM, DAMAGES OR OTHER LIABILITY, WHETHER IN AN ACTION OF CONTRACT, TORT OR OTHERWISE, ARISING FROM, OUT OF OR IN CONNECTION WITH THE SOFTWARE OR THE USE OR OTHER DEALINGS IN THE SOFTWARE.
This product uses the LZ4 compression library. LZ4 is © 2011-2016 Yann Collet and is governed by the following license:
All rights reserved.
Redistribution and use in source and binary forms, with or without modification, are permitted provided that the following conditions are met:
- Redistributions of source code must retain the above copyright notice, this list of conditions and the following disclaimer.
- Redistributions in binary form must reproduce the above copyright notice, this list of conditions and the following disclaimer in the documentation and/or other materials provided with the distribution.
THIS SOFTWARE IS PROVIDED BY THE COPYRIGHT HOLDERS AND CONTRIBUTORS "AS IS" AND ANY EXPRESS OR IMPLIED WARRANTIES, INCLUDING, BUT NOT LIMITED TO, THE IMPLIED WARRANTIES OF MERCHANTABILITY AND FITNESS FOR A PARTICULAR PURPOSE ARE DISCLAIMED. IN NO EVENT SHALL THE COPYRIGHT HOLDER OR CONTRIBUTORS BE LIABLE FOR ANY DIRECT, INDIRECT, INCIDENTAL, SPECIAL, EXEMPLARY, OR CONSEQUENTIAL DAMAGES (INCLUDING, BUT NOT LIMITED TO, PROCUREMENT OF SUBSTITUTE GOODS OR SERVICES; LOSS OF USE, DATA, OR PROFITS; OR BUSINESS INTERRUPTION) HOWEVER CAUSED AND ON ANY THEORY OF LIABILITY, WHETHER IN CONTRACT, STRICT LIABILITY, OR TORT (INCLUDING NEGLIGENCE OR OTHERWISE) ARISING IN ANY WAY OUT OF THE USE OF THIS SOFTWARE, EVEN IF ADVISED OF THE POSSIBILITY OF SUCH DAMAGE.