Guide: Automating Workpiece Rotation for Keyence TM-X Runout Inspection Systems
By Adlin Alwyn, Applications Engineering Team
Published on Jan. 26, 2026
The Keyence TM-X Series is widely used to measure features and compare the results against specifications defined by geometric dimensioning and tolerancing (GD&T) on cylindrical parts like medical needles, motor shafts, and electrodes. While the sensor performs automated image analysis instantly, the physical setup often remains a manual bottleneck.
For runout or concentricity inspections, the part must be rotated 360 degrees. Relying on an operator to manually rotate the part creates significant risk, as human error can lead to handling inconsistencies that invalidate the results. The only way to ensure repeatable runout data is to replace the operator's hand with a precise, motorized rotating axis.
This guide details how to integrate a Zaber motorized rotary stage with the TM-X sensor. This setup creates a benchtop inspection station where an operator loads a discrete component, and the Zaber stage automates the precision rotation within the TM-X sensor’s view to capture the full profile. This ensures consistent data acquisition and frees the operator from manual manipulation during the scan.
Runout Inspection System Requirements
The primary objective of runout inspection is to measure surface deviation relative to a central axis. To do this effectively, the sensor needs to capture the profile at specific, repeatable angles.
Figure 1: This video shows a typical tool head runout inspection setup featuring a Keyence TM-X5040 telecentric measurement sensor and a Zaber motorized rotation stage. You’ll see both the Zaber Launcher application to start the rotary stage and the TM-X Navigator interface performing real-time silhouette analysis and micron-level dimensional verification.
Manual rotation or simple conveyor belts often lack the angular resolution required for tight-tolerance inspections. Adding a motorized rotary stage to the TM-X base overcomes this limitation. It allows for precise control and automation of the workpiece rotation to capture profiles at exact intervals (e.g., every 10 degrees).
Hardware & Assembly
1. The Sensor System
The Keyence TM-X5000 Series is the primary choice for runout inspection applications. In this guide, we use the following sensor configuration:
- TM-X5040: Sensor Head
- TM-X5000: Controller
The TM-X5040 sensor head features mounting holes at the focus mark, designed to align the target part within the field of view.
2. The Motion System
We recommend the Zaber RSW rotation stage for use with the TM-X. It is compact, precise, and connects easily to PC or PLC architectures.
- Option A: PC-Based Control (Lab/Offline)
- Rotation stage: X-RSW60C
- Why: It has a built-in controller and daisy-chaining capability. It only requires a power supply and a USB connection to a PC. This is ideal for benchtop test stations using a laptop.
- Option B: PLC-Based Control (Industrial/Inline)
- Rotation stage: RSW60C-T3A + X-MCC Controller
- Why: The external X-MCC controller offers industrial I/O (input-output) or Ethernet capabilities, allowing a central PLC to drive the motion logic.
The Keyence TM-X5040 with the RSW configuration works well because the workpieces being inspected are well matched to the sensor size, and the focus mark mounting holes align directly with the Zaber RSW rotation stage mounting holes; see the image below.
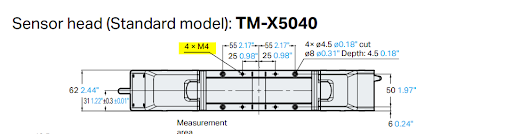
Figure 2: This picture highlights the Keyence TM-X5040 sensor's focus mark M4 holes that align directly with the Zaber RSW rotation stage.
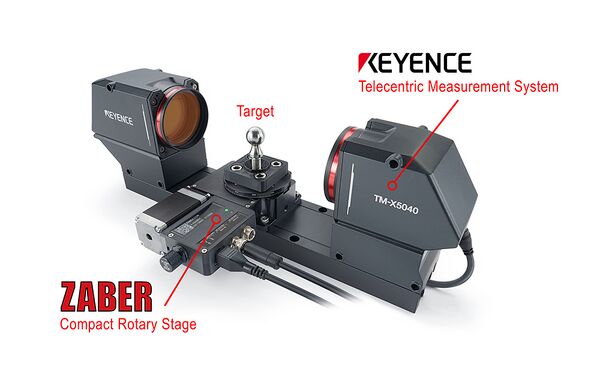
Figure 3: This picture illustrates the Keyence TM-X Series with the Zaber stage mounted directly to the focus mark of the TM-X5040 sensor.
Note: While the RSW’s M6 mounting slots line up directly to the TM-X5040 sensor’s M4 threaded hole pattern, an adapter plate is required to accommodate the screw size difference. For other TM-X models, such as the TM-X065 or TM-X120, an adapter plate is necessary for both alignment and screw compatibility. Contact us for more information.
3. Bill of Materials (PLC Version Example)
| Item | Description | Qty | Unit Price (USD) | Subtotal (USD) |
|---|---|---|---|---|
| RSW60C-T3A | Zaber Rotation Motion Stage | 1 | $1,962 | $1,962 |
| X-MCC1 | Zaber 1-axis controller | 1 | $1,130 | $1,130 |
| MC10T3 | Zaber Motor Cable | 1 | $33 | $33 |
| KX13B | Zaber Accessory Kit (USB, Power, Data) | 1 | $63 | $63 |
| TM-X5040 | Keyence Sensor Head | 1 | Contact Keyence | - |
| TM-X5000 | Keyence Controller | 1 | Contact Keyence | - |
| Total | $3,188 + Keyence Cost |
Table 1: Bill of Materials. Note: The Zaber website provides up-to-date pricing and lead times.
Assembly & Integration Tips
- Rigid Mounting: Both the Keyence sensor and the Zaber stages must be mounted to a rigid, vibration-dampening surface like an optical breadboard or sturdy machine frame to ensure consistent accuracy.
- Cable Management: Properly routing and securing all cables will prevent snags, damage, and interference with the moving workpiece. If the workpiece being inspected has wires or cables coming out of it, we recommend choosing a rotation stage with a built-in slip ring, as shown here, to enable continuous rotation.
- Workpiece Adaptor: The workpiece adaptor can be designed in such a manner that would allow for quick, repeatable loading and unloading of the workpiece to reduce downtime. Zaber offers a range of standard adaptor plates to expand mounting features on the stage and can also offer custom solutions like magnetic bases and quick clamps. Contact us to inquire about customizations.
- Stage Mounting: The Zaber RSW stage mounts directly on the focus mark for the Keyence T-MX5040 sensor. However, when customers use the TM-X065 sensor or the TM-X120 sensor head, they require an adaptor plate to mount the Zaber RSW stage on the focus mark. Keyence offers these adaptor plates. Please contact their team here for more information. The Zaber customization team is also happy to help make adaptors, please contact us.
Software Control: Integrating Precision and Measurement
Both Zaber and Keyence provide powerful, free software to simplify this process. Zaber's software focuses on motion control, while Keyence's is centred on high-speed measurement.
- Zaber Launcher: This application is primarily used for initial device setup, testing individual movements, and low-code or no-code control. See here for further information.
- Zaber Motion Library (ZML): This library provides an easy-to-use API for advanced automation and system integration using languages such as Python, MATLAB®, and C#. While ZML is well-suited for complex or highly customized applications, most inspection applications require only a single, repeatable motion sequence and can be implemented entirely using Zaber Launcher. It provides all the necessary functionality without the need for custom code.
- TMX Navigator: The TMX Navigator is a free software platform designed by Keyence for use with their TM-X5000 Series of Telecentric Measurement Systems. This software is essential for setting up, controlling, and analyzing data from the high-speed TM-X sensors. Keyence Manuals for their software and sensors are available here.
In this article, we will mainly focus on how to automate the workpiece rotation using Zaber Launcher.
Software Set Up for Automating Workpiece Rotation Using the RSW Stage:
Start by downloading and installing Zaber Launcher from here. Then follow the instructions to set up the Zaber device with its reference position:
1. Connect the Zaber RSW rotation stage to your computer via USB or Ethernet, then power on the system.
2. Add a New Connection in the Zaber Launcher application, as shown in the tutorial here. Zaber Launcher automatically detects connected devices. The RSW will appear in the device list without requiring manual configuration, allowing users to immediately begin setup and operation.
3. Open the Basic Movement App in Zaber Launcher and press the Home button to home the stage. This process clears the WR (Warning) flag and sets the device’s reference position.
Automating precise, repeatable motion sequences with Zaber devices can be done using the stream command set. The stream buffer (store mode) is a dedicated memory space on the device's controller that stores a list of commands, or a "sequence," for later execution. This powerful feature pre-programs and stores a series of motion commands directly on the Zaber device, which can then be executed with a single command or triggered by an external digital input, like a push button or a signal from the Keyence system. A stored sequence can be executed infinitely without needing to be resent from the computer. Therefore, eliminates the need for continuous software communication during operation on the Zaber side, reducing communication latency.
The following procedure outlines how to store a specific movement sequence and trigger it using a digital input (example: a PLC digital output) on the Zaber X-MCC external controller. Note: Some built-in controller devices, like the X-RSW, can be modified to have limited IO (Input/Output) capabilities. Contact our applications engineering team for more information.
Step 1: Configure Digital Input Trigger
For Zaber devices that need external configuration, such as a setup where an external sensor or a separate piece of hardware triggers a movement, the Zaber Launcher Triggers Application is the most straightforward way to configure this. This application, shown below, provides a graphical user interface (GUI) that simplifies the process of creating "trigger conditions" and "triggered actions" without requiring low-level programming.
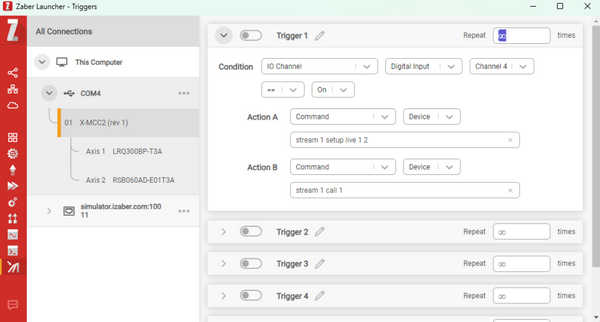
Figure 4: This figure shows the Zaber Launcher - Triggers application interface, demonstrating a low-code environment for configuring automated workflows.
In the trigger example setup shown above, a digital input channel (#4) will activate the stream buffer (stored action commands) defined. This typically involves setting the IO channel trigger parameter for the desired channel to set up the stream on live and call it. This IO step is optional when using stages with integrated controllers, as IO capabilities are offered by default only on the external controller (X-MCC).
Step 2: Check and Clear Existing Stream Buffers
Before building a new motion sequence, it's good practice to check if any stream buffers are already stored on the device. It helps prevent conflicts and ensures a clean slate for future programs. This can be done by listing all existing buffers by issuing the command: stream buffer list If the command returns any active stream buffers (e.g., stream buffer 1), they can be erased to free up memory and prepare for the new sequence. For example, to erase buffer number 1, send the command: stream buffer 1 erase
Step 3: Build the Stream Buffer Motion Sequence
Now, it’s time to define the precise motion sequence and store it in a stream buffer. This can be done using the Command Batch tool in Zaber Launcher or by sending the commands through the Terminal, as shown below.
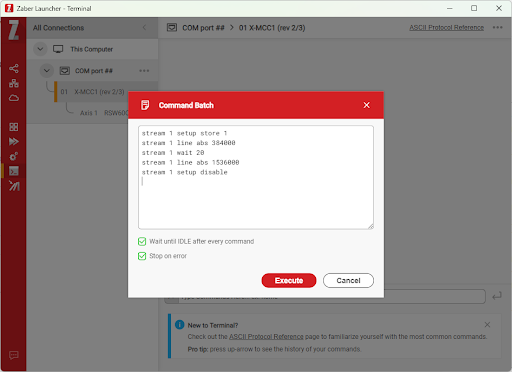
Figure 5: The picture shows the Zaber Launcher - Terminal interface featuring the Command Batch tool. This window allows users to input and execute a sequence of ASCII protocol commands, such as setting up motion streams and defining absolute movements to be sent to the controller in a single block, streamlining complex device testing and routine task automation.
Here’s an example of a stream buffer that moves the RSW stage to a specific absolute position, waits briefly, and then returns it to its starting point:
stream 1 setup store 1
stream 1 line abs 384000
stream 1 wait 20
stream 1 line abs 1536000
stream 1 setup disable
Let's break down what each line in this stream buffer does:
- stream 1 setup store 1: This command initiates the recording of Stream Buffer 1. The store keyword indicates that the following commands should be saved in the non-volatile memory of the controller. The 1 at the end specifies that this buffer will control Axis 1.
- stream 1 line abs 384000: This is the first motion command. It instructs Axis 1 (RSW stage) to move to an absolute position of 384000 microsteps (90 degrees). This is where the initial inspection position would be.
- stream 1 wait 20: This command introduces a 20-millisecond delay after the move is complete. This wait time is crucial for allowing the Keyence sensor to complete its measurement, capture data, or for the stage to settle completely before the next action.
- stream 1 line abs 1536000: This command instructs Axis 1 to move to an absolute position of 1536000 microsteps (360 degrees). This could be a "return to home" position, a "final inspection" position, or a "workpiece unload" position.
- stream 1 setup disable: This command concludes the recording of the stream buffer, saving the sequence. The disable keyword prepares the buffer to be called by a trigger in "live" (operational) mode.
Once these commands are executed by pressing the Execute button, the sequence is permanently stored on the Zaber device even after a power cycle or system reset command. The contents of the buffer can be verified by sending: stream buffer 1 print.
Step 4: Testing The Automated Sequence
With the stream buffer configured, the setup can be tested. This can be done simply by pressing the designated push button connected to the trigger input, or setting the specific digital input channel associated with the trigger to a HIGH state using their external control system (e.g., a PLC or Keyence system's output). The Zaber device will immediately execute the stored motion sequence based on the trigger condition.
Important Calculation Notes: Converting Zaber Engineering Units
When programming Zaber devices, motion commands are typically given in Zaber units. The device's specific microstep resolution is used to translate desired physical movements (e.g., millimetres or degrees) into Zaber microsteps.
The Zaber formula to calculate position in Zaber microsteps is:
Desired Position = Zaber units x microstep resolution
For instance, in the example buffer provided, the RSW60A-T3A Rotary Stage (Axis 1) position data is calculated as follows:
- Microstep Resolution: 0.000234375°
- To achieve a desired move of 90 degrees:
- Zaber Units for RSW60A-T3A = 90/0.000234375 =384000 Zaber Units
Understanding and applying these calculations makes it possible to precisely control Zaber stages to rotate a workpiece with the accuracy required for high-performance Keyence optical inspection. This robust, on-device programming capability significantly simplifies system integration and ensures highly reliable automated workflows.
Summary
By adding a Zaber RSW stage to a Keyence TM-X sensor, the gap between manual part loading and automated data collection is bridged.
- Throughput: Operators spend less time fiddling with alignment.
- Repeatability: Every part is measured at the exact same angular intervals every time.
- Simplicity: The "Stream" feature allows the automation to run without a dedicated PC constantly sending commands.
For assistance selecting the right stage, programming streams or designing a custom part holder, contact our Applications Engineering team.