Resolving "Externally Managed Environment" Errors in Python (MacOS, Linux)
By Mike McDonald
Published on Jun. 17, 2024
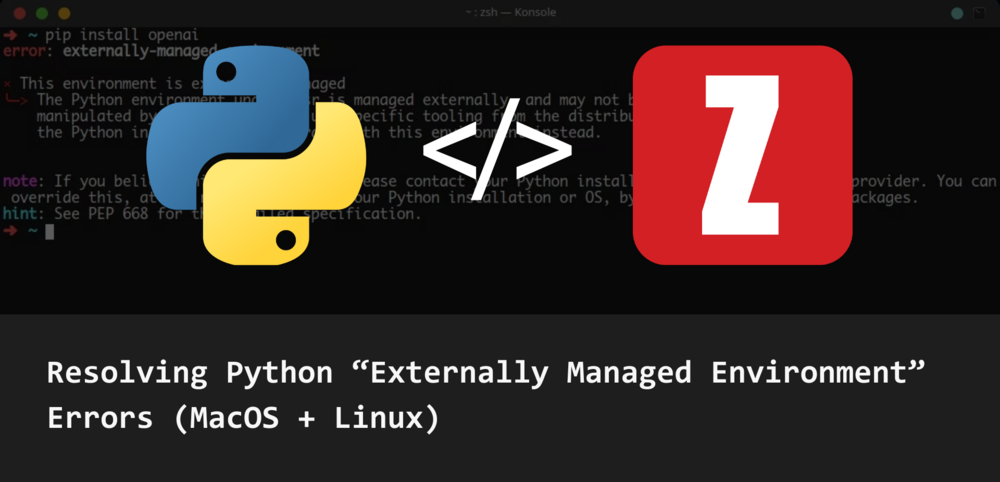
Are you encountering an "externally-managed-environment" error while installing Python packages on Linux or macOS? (This might include our ZML - Zaber Motion Library). If so, don't panic, we're here to help.
What's changed?
Linux and MacOS ship with a "system Python" pre-installed. Some of the underlying OS functionalities are Python scripts, and they require Python to function. Most installation instructions for Python packages suggest the straightforward pip install ... method, which will install to the system Python directory. These packages may also pull in dependencies, and occasionally these dependencies overwrite the version of dependencies that the OS depends on, causing the OS to break.
The preferred solution for this has always been to use "virtual environments", and install packages to those virtual environments. This ensures you are not "polluting" the system Python. However, many users don't use these as they can seem complex and confusing.
Starting with Python 3.11, these operating systems have begun labeling their Python installations as 'externally managed' to encourage the use of virtual environments. This means the OS takes care of Python, not a tool like pip. As a result, using pip install ... on the system Python will now trigger an "externally-managed-environment" error.
Two solutions
There are two avenues for resolving this. The first one is to include the --break-system-packages parameter in the pip install ... command. While this is the easiest workaround, we do not recommend it as it exposes the same concerns that the change was meant to address.
The second avenue, and our recommended one, is to use a virtual environment. A complexity here is that the method of setting up a virtual environment is not consistent between development environments. Each IDE has it's own way of setting them up. There are also different virtual environments you can use; the one we'll be using here is venv. It is included with Python.
Setting up a virtual environment
We'll cover creating virtual environments in three common cases: command line usage, and creating projects in either the PyCharm or Visual Studio Code IDEs. This information is also covered in the getting started section of the Zaber Motion Library API.
Command line
The following commands illustrate how to create a light-weight virtual environment using venv in a subdirectory called .venv. First make sure you are in the project subdirectory, then type the following command:
python3 -m venv .venv
Then activate the environment (note that you must activate the virtual environment every time you start a new shell):
source .venv/bin/activate
You can then use the standard, pip command to install the package. For example, installing the Zaber Motion Library would be:
pip install zaber-motion
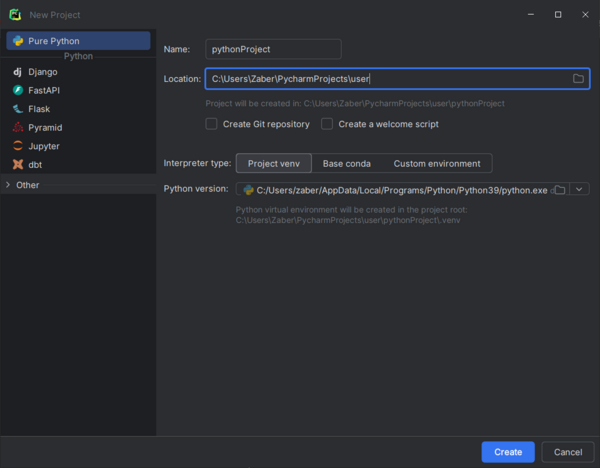
PyCharm
With the PyCharm IDE, when creating a new project, select "Project venv" from the interpreter selection. Next, ensure that the Python version selected matches the version you are using. If you cannot find an interpreter version with the appropriate version, try reinstalling Python.
To install the library, click on Python Packages tab at the bottom, search for zaber-motion and click the Install button.
Alternatively, enter the following command into the PyCharm terminal:
pip install zaber-motion
VS Code
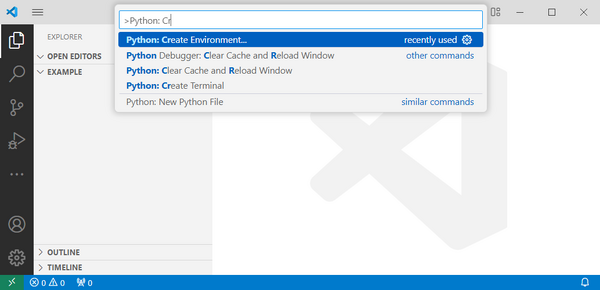
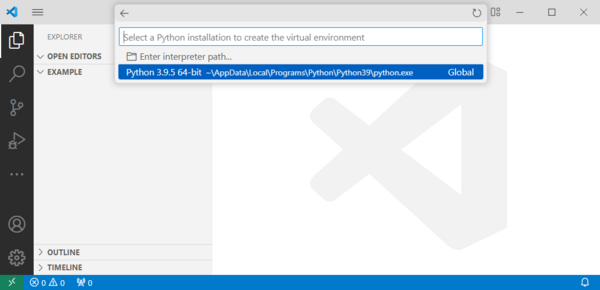
When using VS Code, first create or open a folder for your new project. Next, open the Command Palette (Ctrl+Shift+P on Linux, Cmd+Shift+P on Mac) and enter Python: Create Environment.
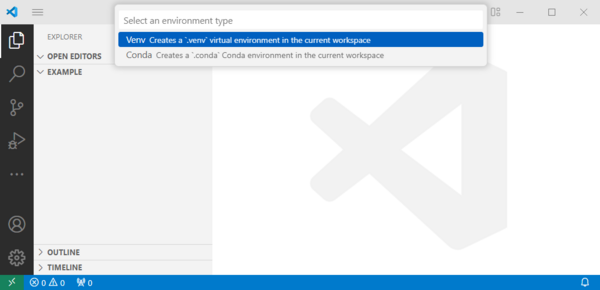
Next select "Venv" to create a new venv virtual environment.
Finally, select the Python interpreter location you plan to use.
To install a library to this virtual environment, open a terminal (Ctrl+Shift+`) and enter:
pip install zaber-motion

Need more help?
If you're not using one of these IDEs, the one you are using should have similar options when setting up a new project. Please contact us if you need any assistance; we're happy to help!