Streamlining Parts Inspection: A Cost-Effective Approach
By Sofia Moreno
Published on Sep. 06, 2024
Precision manufacturing demands flawless parts. Manufacturers have various options for high precision quality parts inspection, including Coordinate Measuring Machines (CMMs) and functional gauges. While these methods offer reliable measurements, there are some limitations. CMMs can be time-consuming and require reprogramming to inspect part variations. Also, they are often shared resources, leading to scheduling bottlenecks. Functional gauges are typically limited to inspecting specific parts and can be costly to produce.
This article explores a cost-effective solution: a custom inspection system built with readily available components that’s able to inspect several parts with unique and complex geometry. We'll detail the design process, hardware selection (with a comprehensive Bill of Materials), software considerations, and potential for further efficiency improvements.
Use Case & Challenge
As a motion control company, we often hear from manufacturers facing challenges in quality inspection. Let’s take a case where there are a few critical parts with varying geometries requiring frequent and precise inspection. In addition to the technical requirements, it’s often ideal to have a compact system and always important to have a cost-effective one.

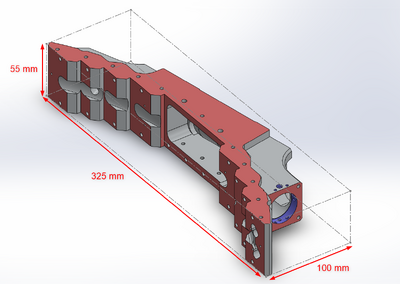
Figure 1: Dimensions of the largest part to inspect.
We’ll start by outlining three key technical requirements that will help ensure success:
1. Ability to validate feature precision within a +/- 25µm tolerance
- Standard specifications would require the use of the CMM on one part in order to establish a reference for the new inspection system. By measuring a single part using the CMM we can ensure that the new system is accurately calibrated and can provide reliable measurements.
- For the purposes of this POC, we wanted to evaluate the new system's repeatability without changing existing incoming quality control (IQC) processes. The long-term goal is to potentially streamline IQC for this part and its variants if the system proves effective.
2. Ability to inspect features and surfaces in any plane.
3. Ability to measure parts with dimensions up to 325 x 55 x 100 mm.
Additionally, we’d like to deliver a solution that has a lower cost than a general purpose CMM ($50,000+), and is able to inspect the parts faster. We estimate 5-10 minutes inspection time for a complex part with a traditional CMM.
Solution: $28,000 Custom Benchtop Inspection System
We built a custom inspection system that met these requirements with a budget of about $28,000. Based on the part we tested on, this in-house solution has an inspection time of less than a minute with a repeatability of 20 µm. Adapting the system to inspect additional parts takes only 30 minutes with simulation software and offline programming. Depending on technical familiarity, assembling this custom system could be completed within a few days.
Hardware Components
As long as we can ensure mechanical compatibility between components during the design, putting the hardware together is relatively easy. We built the frame with some adaptor plates made in-house, but those can easily be replaced with off-the-shelf aluminum extrusion hardware from an extrusion vendor.

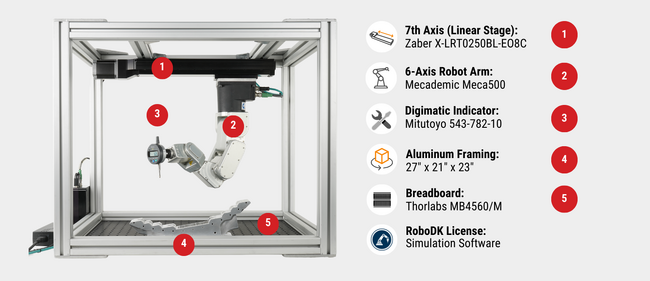
Figure 2: The core components of our solution.
1. Zaber X-LRT0250BL-E08C linear stage
- Acts as as 7th axis for the Meca500, extending the range that it can cover by 250mm
- Includes integrated motor, encoder, and controller to minimize your integration time
- Offers high precision, within 4 µm repeatability
- Eliminates pinch points with a stainless steels dust cover
- Uses high stiffness bearings to support the moving weight of the robot arm while keeping deflections to a minimum
2. Mecademic Meca500 6-axis industrial robot arm
- Offers dexterity to target measurement surfaces at various angles of approach
- Is able to reach a 330 mm area
- Also high precision, within 5 µm repeatability
3. Mitutoyo 543-782-10 variance indicator
- Able to connect to a PC over USB or Bluetooth for data collection
- Offers fine measurement resolution of 10 µm
4. Aluminum framing
- Easy to assemble T-Slot framing, available from a wide variety of vendors, can be sourced quickly and at a low cost
- Has standard bracketing and hardware, including the option to add plexiglass panels for safety
- Complete off-the-shelf aluminum extrusion hardware, such as this configuration from Misumi
5. Thorlabs optical breadboard
- Covers 450 x 600 x 12.7 mm area
- Includes M6 threaded holes for convenient mounting
6. Additional accessories:
- An adaptor plate to mount the robot arm to the linear stage was fabricated in house.
- A flange to mount the variance indicator to the end of the robot arm was 3D printed in house
Bill of Materials Cost
| Item | Description | Qty | Price/unit (USD) | Subtotal (USD) |
|---|---|---|---|---|
| Aluminum framing | Aluminum extrusion and mounting hardware | 1 | $400.00 | $400.00 |
| Breadboard | 450 x 600 x 12.7 mm, M6 (Thorlabs MB4560/M) | 1 | $574.03 | $574.03 |
| Inspection alignment part | 3d printed, mounted to the breadboard | 1 | $2.00 | $2.00 |
| 7th axis (linear stage) | X-LRT0250BL-E08C | 1 | $4,492.0 | $4,492.0 |
| U-DC06 | LRT USB data cable | 1 | $11.00 | $11.00 |
| Zaber power supply | LRT power supply | 1 | $107.00 | $107.00 |
| Mecademic Meca500 | 6-axis robot arm | 1 | $19,000.0 | $19,000.0 |
| Digital gauge | Mitutoyo plunger-style indicator | 1 | $188.10 | $188.10 |
| Spare batteries | Button/coin cell battery (SR44) | 2 | $2.88 | $5.76 |
| Side panels and hardware | Optional acrylic panels | 1 | $200.00 | $200.00 |
| Indicator mount | 3D printed part with 4x M3 flat head screws | 1 | $0.50 | $0.50 |
| Meca500 - LRT adapter | Waterjet aluminum bracket | 1 | $3.00 | $3.00 |
| Zip ties | cable management | 12 | $0.05 | $6.00 |
| RoboDK license | Subscription license | 1 | $3,300 | $3,300 |
| $28,289.39 |
Table 1: Bill of Materials
Software Control
Similar to ensuring mechanical compatibility to make the assembly easy, it’s important to consider and plan how the controls will come together with devices from various vendors. This is where communication and software come in that coordinate the interface, movement, and data collection and storage.
Whenever operating robot arms we highly recommend simulating and using offline programming to generate the motion virtually before running your program on the real hardware. This helps prevent movements that cause singularities or are outside the robot’s reach, checks for collisions, and validates the system is measuring what and where you expect.
RoboDK Simulation and Offline Programming
We used RoboDK to simulate and generate the program for both the robot and 7th axis. This software features an extensive library of industrial robot arms, external axes, and other tools to help build a simulated model of your system. From there, users can generate programs to control the motion devices without learning vendor-specific programming, and you can run it offline for testing prior to moving any real hardware.
In particular, RoboDK has drivers for both the Mecademic Meca500 and Zaber X-LRT0250BL-E08C. This made programming the movement a matter of importing the CAD models, setting up reference frames, and selecting the measurement points.

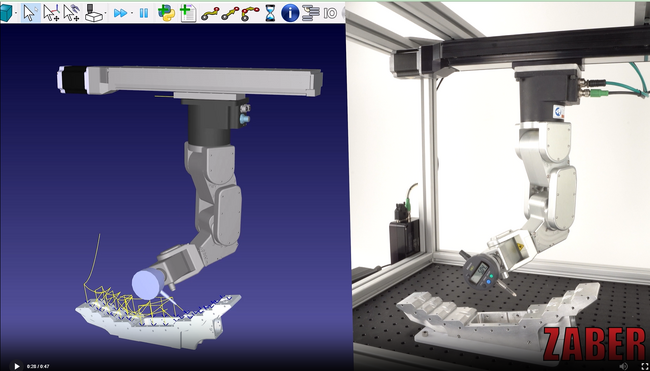
Figure 3: A side-by-side comparison of RoboDK’s virtual environment, where robot movements can be simulated and programmed, and the physical hardware it controls.
Since we are looking for repeatability of specific features between parts, we don’t need to be too precise on the exact location of each measurement point. RoboDK allows us to easily drag and drop a target normal to any surface on the model of the part being inspected, which makes setting up 40 points of interest very quick. Based on those points, RoboDK automatically makes a program, which we simulate first to check for any potentially concerning joint moves or tool paths before running on the hardware.
To measure different parts, we can simply replace the CAD model of the part in RoboDK and adjust the measurement points accordingly.
Zaber Motion Library and Mecademic Python Library Options
While the simulation tool is very powerful, in order to integrate data collection, analysis, storage, and reporting we may need to write our own software. There are a variety of options, whether PC or PLC based, for this. A popular, modern, and user friendly choice is Python programming.
Zaber offers the Zaber Motion Library (ZML), an easy-to-use API for communication with Zaber devices, for Python (among other languages). Mecademic also offers a Python API that includes tools which give access to the features of the Mecademic robot such as ‘MoveLin’ and ‘MoveJoints’, available through their TCP/IP text interface. Both libraries are compatible with Windows, Linux, and Mac.
Instructions for downloading and installing each library can be found here:
- ZML: https://software.zaber.com/motion-library/docs
- Mecademic Python API: https://github.com/Mecademic/mecademicpy
Repeatability Results
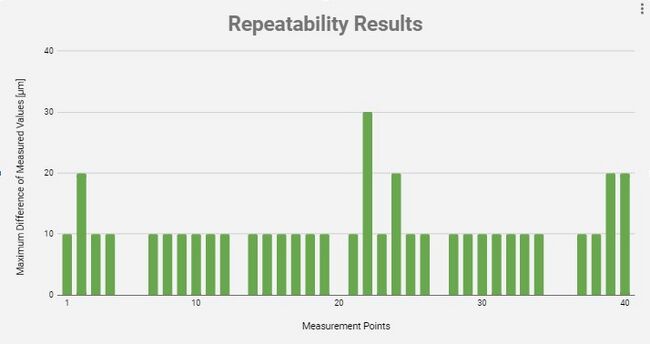
Repeated measurements of the same part consistently demonstrated a repeatability within +/- 15 µm, with a spread of 30 µm. See results table in appendix below.
Additional Thoughts
Further efficiencies could include increasing the travel of the 7th axis to allow for inspection of multiple parts in one run. This would increase the footprint, but it allows users to walk-away for longer periods of time. Alternatively, it’s possible to use a dual gripper where one tool is a gripper and the other is the digital indicator gauge or probe. This way, users can set up a batch of parts to be inspected that the robot + 7th axis can reach on one side, and have the robot pick and place the parts to where they would inspect them before then dropping them in another area outside the inspection workspace.
Conclusion
By leveraging readily available hardware and software components, this custom inspection system offers a cost-effective and efficient solution for ensuring the quality of parts in precision manufacturing. The ability to quickly reprogram the system for different part variations and achieve high repeatability makes it a valuable asset in production environments where speed and repeatability are essential. This approach demonstrates that building a tailored inspection system can be a viable and practical option for manufacturers seeking to optimize their quality control processes.
Appendix

Figure 4: Repeatability chart showing the maximum deviation measurement results at each of the 40 test points.