Using the X-JOY Joystick to Control Zaber Motion Devices
By Nancy Chu, Applications Engineering Team
Published on Feb. 15, 2018
Introduction
A joystick can be a useful complement to many motion control applications. Joysticks, in this context, typically allow for graduated velocity and position control and commonly have buttons that can be mapped to commands, offering the freedom to operate your devices without a computer connection. In this article, we will look at the features of Zaber's X-JOY3 joystick and the steps to set it up. We will also explore some applications that benefit from implementing a joystick control, and look at the different capabilities you can use for your next system.
Zaber X-JOY3 Features
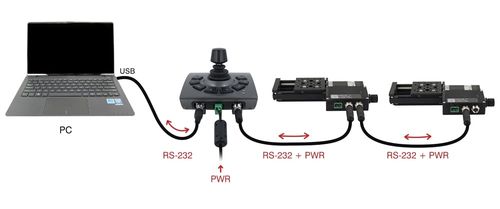
The X-JOY3 is Zaber's 3-axis joystick. It is compatible with all of Zaber's devices and can be daisy-chained with them to share power and data, keeping cabling simple and minimal. Later, we'll go through how to configure the joystick, but first let's look at an overview of the X-JOY3 features.
Joystick Knob
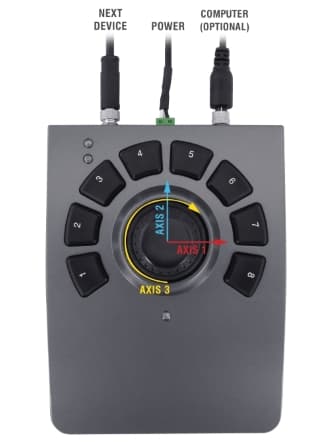
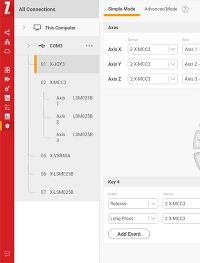
The joystick knob offers manual control of three axes, shown in Figure 2: Axis 1 [Left,Right], Axis 2 [Up,Down], and Axis 3 [Counterclockwise,Clockwise]. For each knob axis, you can specify the following:
- Target Device/Axis:The address of the motor that you want the knob axis to control, including the device number, and, if the device controls more than one motor, the axis number.
- Axis Direction:Coordinates the direction of movement of a device and the knob that controls it.
- Maximum Speed:The speed at which the motor will move when the knob is moved to the maximum in an axis
- Resolution:The number of speed increments in an axis to reach the maximum speed.
- Speed Profile:The way the speed changes over the travel as you move the knob through increments. The options are linear, squared, or cubed. The linear profile means each increment increases speed by the same amount. Squared and cubed profiles allow finer speed control at low speeds.
Keys
Each of the X-JOY3's 8 keys, shown in Figure 2, can be programmed to send commands to any device connected downstream in the daisy-chain. The commands can be set to target a specific device or axis in the chain or all the devices.
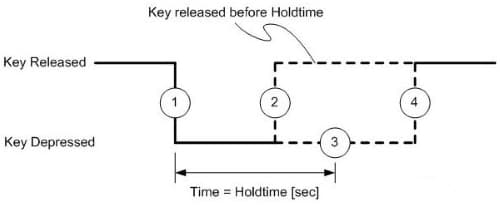
Each button has four available key events to which commands can be mapped. As shown in Figure 3, event 1 occurs as soon as the key is pushed; event 2 occurs if the button is released shortly after pressed; event 3 occurs if the button is held; and event 4 occurs when the button is released after being held. You can map commands to one or more of these events, and you can map multiple commands to a single event.
Alerts
As shown in Table 1, the joystick can be set to send alerts. Alerts are responses sent upstream from the joystick, which are intended to convey information to a computer if one is connected. If the setting 'comm.alert' is set to 1 on the joystick, then any key event can be set to send an alert response. In cases where you have more complex actions that can't be easily mapped to a button, you can write a computer program that watches for these responses in order to do these functions.
| Key | Short Press | Long Press |
|---|---|---|
| 1 | Stop all axes | Home all axes |
| 2 | Send alerts* 1, 2 | Send alerts* 1, 3, 4 |
| 3 | Move to saved position | Save current position |
| 4 | Move to saved position | Save current position |
| 5 | Move to saved position | Save current position |
| 6 | Axis 1 low speed | Axis 1 high speed |
| 7 | Axis 2 low speed | Axis 2 high speed |
| 8 | Axis 3 low speed | Axis 3 high speed |
Each of these can be moved, changed, or removed. We will explain how in a later section.
Set-Up and Configuration
Once you have a joystick and devices, you're ready to set up and configure the system. To get started with your X-JOY3, we recommend using Zaber Launcher for the initial setup.
Daisy-chaining
Once Zaber Launcher is installed, it only takes three steps to get started.
 1. Connect the Joystick to the computer as the first device in the daisy chain and connect the devices you would like to control after it. |
 2. Open Zaber Launcher and connect to the serial port/USB. Go to All Applications and select the X-JOY app. |
 3. Click X-JOY3 from the device list to configure. |
For more information on connecting devices, see the Daisy-chaining Data and Power technical paper.
Configuring Behaviour
To understand how to configure the manual knob and keys on the X-JOY3, let's take a look at some simple ASCII commands:
To set joystick axis 1 (left/right) to control the second device connected in the daisy-chain use the following command
/1 joystick 1 target 2 1
To configure key 1 to send a home command when it is held down for more than one second use the following command
/1 key 1 3 add home
The complete command set is outlined in detail in the X-JOY3 manual. Configuring the joystick can be done directly by sending ASCII commands over the serial connection from a terminal application, or by writing code in the language of your choice using Zaber Motion Library, but the easiest way is by using the X-JOY app in Zaber Launcher. This is described below.
Using Zaber Launcher's X-JOY app
The X-JOY app in Zaber Launcher is specifically designed to simplify X-JOY3 configuration by offering intuitive graphical control.
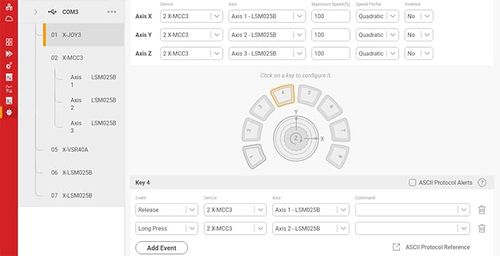
Once the X-JOY app is open, it will automatically detect the device and axis. Then you can adjust the maximum speed, speed profile, and axis inversion in Simple mode. Advanced mode allows more direct editing of device and axis numbers and additional settings such as resolution. After making changes, make sure you press the "Apply" button.
Click any of the eight Key buttons shown in Figure 4 to configure the functions that the selected key will execute. Each key has four event types and an editable field that matches the ASCII message format. The event is the action you take on your joystick. It will control the selected device to execute the command. Press the button "Add Event" to add another command or click the trash can icon on the right side to remove it. To upload all the commands to the joystick, press the "Apply" button in the top right corner.
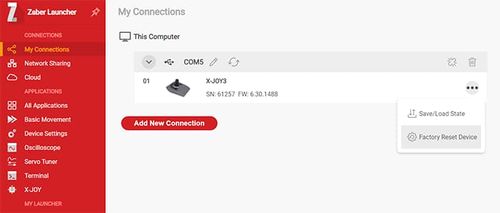
The three dots menu in the top right corner offers a list of options, which includes saving and loading configurations and calibrating the joystick. Figure 5 shows how you can reset the settings to default in "My Connections" in Zaber Launcher.
Using a Zaber Motion Library Script to Configure
In some cases, you may want to load several commands at once. While you can do this using the X-JOY app, you can write a script using Zaber Motion Library in your preferred programming language. The following example shows a simple script written in python to program multiple keys at the same time.
      from zaber_motion import Library
      from zaber_motion.ascii import Connection
      Library.enable_device_db_store()
      with Connection.open_serial_port("COM8") as connection:  # confirm that this is the right serial port
          device_list = connection.detect_devices()
          print("Found {} devices".format(len(device_list)))
          # define joystick
          x_joy = device_list[0]
          # define axes
          device2 = device_list[1]
          x_axis = device2.get_axis(1)
          device3 = device_list[2]
          y_axis = device3.get_axis(1)
          device4 = device_list[3]
          z_axis = device4.get_axis(1)
          # set the joystick axes to control the X, Y, Z axes defined above
          x_joy.generic_command("joystick 1 target 3 1")  # x-axis
          x_joy.generic_command("joystick 2 target 4 1")  # y-axis
          x_joy.generic_command("joystick 3 target 5 1")  # z-axis
          # set the Y-axis (joystick axis #2) to control axis #1 on device #2
          x_joy.generic_command("joystick 1 target 98 1")
          # clear all keys
          x_joy.generic_command("key clear all")
          #
          # clear anything stored in key 1 event 3
          x_joy.generic_command("key 1 3 clear")
          # program key 1 event 3 to home all axes
          x_joy.generic_command("key 1 3 add 0 home")
          # program key 3 event 2 to set the speeds of device 2 and 3 to different values
          x_joy.generic_command("key 3 2 add 2 set maxspeed 100000")
          x_joy.generic_command("key 3 2 add 3 set maxspeed 200000")
Use Cases and Examples
Now that we have reviewed features and configuration of the X-JOY3, let's look at a few practical examples to demonstrate where the a joystick can save time and effort.
Enclosed Environments (Vacuum or Pressure Chambers)
Zaber offers a variety of vacuum-rated devices, which are used in controlled, low-pressure chambers. This prevents you from being able to use manual control knobs on devices to adjust them by hand. By connecting a joystick outside the chamber, users are given the ability to make these manual movements without a computer connection. For more information on vacuum devices, see the technical paper: Design Consideration for Vacuum Applications.
Multi-axis Control and Toggling (3+ devices)
While the X-JOY3 has three axes of manual control, some systems to which it will connect will have more than three motors. Rather than using two joysticks, you can set-up buttons on the joystick to switch which axis the joystick knob targets.

Figure 6 shows an example of a 4-axis system, made up of two linear stages, one rotary stage, and a gripper. You can map the left/right and up/down knob axes to control the linear stages, and then have a button that switches control of the clockwise/counterclockwise knob axis between rotating the gripper and opening/closing it.
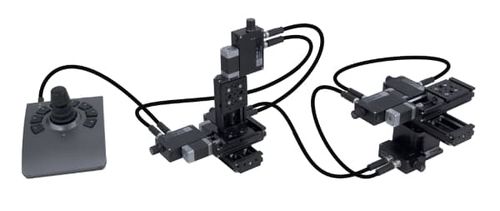
Figure 7 shows a system of two separate XYZ setups that are daisy-chained together. While the system has 6 axes in total, you can use one joystick by setting a single key that switches the targeted devices between the first set of axes and the second set.
To share a joystick knob axis between two devices, simply configure two key events to toggle the control between one device and the other. Figure 8 shows an example in which Key 4 is programmed so that the “Press” event sets X-JOY3 x-axis (Left and Right) to control device 2 (X-LSM025B) and the “Long Press” event sets XJOY3 y-axis (Up and Down) to control device 3 (X-LSM025B).
Configuring key 4 to toggle control Figure 8: Configuring key 4 to toggle control.
Raster Scan with a Stream Buffer
A common use for XY systems is to move through a series of lines to scan an area or stop at an array of positions and perform an action at each stop. These kinds of movements are known as raster scans. In cases where having a computer connection is not feasible, raster scan movements can be saved to a stream buffer and run using a X-JOY3 key. For more information on streams, see Streamed and Interpolated Multi-Axis Motion.
The following script stores a raster scan on an X-MCC2 controller and programs key 8 on the X-JOY3 to call the scan. At each position, it will turn on a digital output to trigger some action, wait for a period, then turn it off. Once this script is run, you will be able to initiate the raster scan by clicking key 8.
      from zaber_motion import Units, Library, Measurement
      from zaber_motion.ascii import Connection
      Library.enable_device_db_store()
      with Connection.open_serial_port("COM8") as connection:  # confirm that this is the right serial port
          # connect to devices
          device_list = connection.detect_devices()
          print("Found {} devices".format(len(device_list)))
          x_joy = device_list[0]  # X-JOY3 is device 1
          x_mcc = device_list[1]  # X-MCC is device 2
          axis1 = x_mcc.get_axis(1)
          axis2 = x_mcc.get_axis(2)
          # define raster scan variables
          col_start = 25  # starting point for the scan (axis #1)
          row_start = 25  # starting point for the scan (axis #2)
          col_dist = 5  # distance in millimeters between each column in grid
          row_dist = 5  # distance in millimeters between each column in grid
          sit_time = 500  # time in milliseconds of pause at each position
          digital_output = 1  # which digital output pin to turn on at each position
          col_num = 12  # number of columns in raster
          row_num = 8  # number of rows in raster
          col_count = 0
          row_count = 0
          axis1.home()
          axis2.home()
          stream = x_mcc.get_stream(1)  # sets up stream 1
          stream.disable()  # disables stream 1 so a buffer can be stored
          stream_buffer = x_mcc.get_stream_buffer(1)  # sets up buffer 1
          stream_buffer.erase()
          stream.setup_store(stream_buffer, 1, 2)  # enable storing for buffer 1 for 2 X-MCC axes
          for row_count in range(row_num):
              stream.line_absolute(
                  Measurement(col_start, Units.LENGTH_MILLIMETRES),
                  Measurement((row_start + (row_dist * row_count)), Units.LENGTH_MILLIMETRES)
              )
              stream.set_digital_output(1, True)  # set DO1 high
              stream.wait(sit_time, Units.TIME_MILLISECONDS)
              stream.set_digital_output(1, False)  # set DO1 low
              for col_count in range(col_num):
                  stream.line_relative(
                      Measurement(col_dist, Units.LENGTH_MILLIMETRES),
                      Measurement(0)
                  )
                  stream.set_digital_output(1, True)  # set DO1 high
                  stream.wait(sit_time, Units.TIME_MILLISECONDS)
                  stream.set_digital_output(1, False)  # set DO1 low
          # program key 8 to call the stream
          stream.disable()
          x_joy.generic_command("key 8 1 clear")  # clears key 8 event 1
          x_joy.generic_command("key 8 4 clear")  # clears key 8 event 4
          x_joy.generic_command("key 8 1 add 2 stream 1 setup live 1 2")
          x_joy.generic_command("key 8 1 add 2 stream 1 call 1")
          x_joy.generic_command("key 8 1 add 2 stream 1 setup disable")  # hold key 8 if you want to stop the stream
          axis1.wait_until_idle()
          axis2.wait_until_idle()
          print("Done!")
Trigger A Script Using Alerts
Most of the examples we've looked at have focused on cases in which it's helpful to have either manual control or keys when you don't have a computer connection available. There are also uses for the joystick in conjunction with a computer script or program.
In particular, the Alert function is useful in sending information upstream from the joystick, back to the computer. Every key event on the joystick can be set to send an alert message to the connected COM port. The script or program can watch for these alerts, and based on which key event occurs, it can run a number of different programs. For example, if you're using the joystick to move a digital camera that is connected to a computer, you can write a script on the computer that captures an image when a particular key alert is received. This would allow you to focus on your subject rather than returning to the computer every time you wanted to capture an image.
To enable alerts for a particular key event, first enable alerts on your device:
/1 set comm.alert 1
Next, enable alerts for the key events you'd like to respond. For example, to have key 2 event 1 send an alert, send:
/1 key 2 1 alert 1
Now, when key 2 is pressed, the following alert will be sent back to the computer port:
!01 0 key 2 1
Discussion/Conclusion
We've discussed several applications and uses for Zaber's X-JOY3 joystick, but there are many more ways the features can be used. If you have an application that you think it may be useful for, or if you have any questions, please contact our Applications Engineering Team at contact@zaber.com. For additional information and troubleshooting, you can refer to our Joystick Manual or our Zaber ASCII protocol manual.