Manuals/LST-E
Disclaimer
Zaber’s products are not intended for use in any critical medical, aviation, or military applications or situations where a product's use or failure could cause personal injury, death, or damage to property. Zaber disclaims any warranty of fitness for a particular purpose. The user of this product agrees to Zaber's general terms and conditions of sale.
Precautions
Zaber's linear stages can produce enough force to cause personal injury. Be careful to not get body parts caught between the moving carriage and the end plates of the stage. Make sure that no loose clothing gets caught in the rotating lead screw.
Maintenance
Teflon-coated (black) lead screws are not designed to be greased. Normally no lubrication is required over the lifetime of the device. If a squeaking sound develops in the lead screw, Super Lube oil with PTFE (Product number #51004) can be applied. Apply a very thin bead over 80% of the contact surface of the lead screw and run the stage slowly from end to end. Wipe off any excess.
Installation
Physical Installation
Mounting
There are several options available for mounting Zaber stages. Use the mounting holes in the bottom to mount to a surface or to another stage. You might have to move the carriage to access the bottom mounting holes. Some stages have mounting holes in the end plates for mounting vertically. Mounting screws are included with most stages.
Caution: Some stages have threaded through-holes in the top mounting plate of the carriage. Be sure not to install mounting screws too deep, causing them to interfere with inside parts of the stage.
Grounding
To prevent damage to the device due to static buildup, the device should be properly grounded.
Failure to ground the unit may result in the unit shutting down unexpectedly or ceasing to communicate with the computer. This problem can be minimized by not touching the unit during operation. If the unit fails due to static discharge, unplugging it and plugging it back in or sending a Restore Settings command will usually fix the problem.
Most Zaber devices are grounded via the shield wire of the data cables. This should normally provide a path to ground via the computer. For units which are being used without a computer, a ground lead should be connected to the shield of one of the data cables.
Mounting the stage with AB105 brackets
AB105 brackets are designed to mount LST family stages to a mounting surface like an optical table. The brackets use the T-channels in the stage base. This allows for any mounting location in the direction of travel and 123 - 128 mm, or 5" spacing from side to side. Mounting instructions:
- Insert the t-nut in the end of the stage as shown and slide it to the desired position.
- Push down the stage and bracket so they are both flush with the mounting surface. Note that the stage has raised contact surfaces on the bottom so the side of the stage does not touch the mounting surface. Tighten the M4 screw to secure the bracket to the stage. It is important that the bottoms of the brackets are flush with the bottom of the stage; otherwise the stage base could be forced to bend slightly open or closed when the brackets are mounted to the mounting surface, causing the moving carriage to become too tight or too loose at that position.
- Use M6 or 1/4"-20 screws to mount the brackets to a mounting surface.
Operation
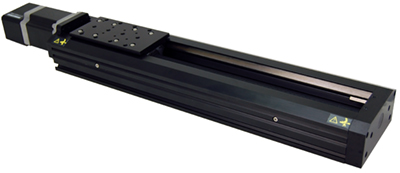
The LST-E01T3 stages are designed to be controlled with any of Zaber's X-Series or A-Series Stepper Motor Controllers. Zaber's controllers and peripherals are designed for ease of use when used together. Optimal settings for each peripheral (such as the default current, speed, acceleration, and limit settings) can be loaded by setting the peripheralid (T:66) on the controller. The peripheral ID is listed as the ID on the peripheral's label. A list of IDs is also available on the ID Mapping page. For more information on device operation, refer to the controller's user manual.
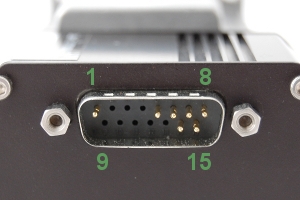
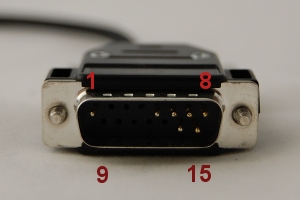
Pinout for D-sub 15 Connectors (A-series and X-Series controllers and peripherals)
| A- or X-series controller (female) | 
|
|---|---|
| T3 Peripheral (male) | 
|
| T4 Peripheral (male) | 
|
| Pin # | Function |
|---|---|
| 1 | +5V |
| 2 | Encoder Error **** |
| 3 | reserved |
| 4 | Away Sensor *** |
| 5 | Home Sensor |
| 6 | Ground |
| 7 | Motor B1 |
| 8 | Motor A1 |
| 9 | +5V * |
| 10 | Encoder A * |
| 11 | Encoder B * |
| 12 | Encoder Index ** |
| 13 | Ground * |
| 14 | Motor B2 |
| 15 | Motor A2 |
* encoder embedded peripherals only
** devices with encoders with index only
*** devices with away sensors only
**** devices with linear or direct-reading encoders only
Alternate Controllers
The actuators may be controlled by any 2-phase stepper motor controller with home sensor input. Warning: Operating the stage without correctly wiring up the home sensor can cause permanent damage to the sensor. We do not recommend using your own controller unless you are familiar with how to control a stepper motor with a hall sensor limit switch. The following information is provided for reference only. Damage to the stage or hall sensor due to incorrect wiring is not covered by warranty.
Motor
The LST-E stage uses a size 23 stepper motor.
- 3 A / Phase
- 1 Ω / phase
- 1.6 mH / phase
Warranty and Repair
For Zaber's policies on warranty and repair, please refer to the Ordering Policies.
Standard products
Standard products are any part numbers that do not contain the suffix ENG followed by a 4 digit number. Most, but not all, standard products are listed for sale on our website. All standard Zaber products are backed by a one-month satisfaction guarantee. If you are not satisfied with your purchase, we will refund your payment minus any shipping charges. Goods must be in brand new saleable condition with no marks. Zaber products are guaranteed for one year. During this period Zaber will repair any products with faults due to manufacturing defects, free of charge.
Custom products
Custom products are any part numbers containing the suffix ENG followed by a 4 digit number. Each of these products has been designed for a custom application for a particular customer. Custom products are guaranteed for one year, unless explicitly stated otherwise. During this period Zaber will repair any products with faults due to manufacturing defects, free of charge.
How to return products
Customers with devices in need of return or repair should contact Zaber to obtain an RMA form which must be filled out and sent back to us to receive an RMA number. The RMA form contains instructions for packing and returning the device. The specified RMA number must be included on the shipment to ensure timely processing.
Email Updates
If you would like to receive our periodic email newsletter including product updates and promotions, please sign up online at www.zaber.com (news section). Newsletters typically include a promotional offer worth at least $100.
Contact Information
Contact Zaber Technologies Inc by any of the following methods:
| Phone | 1-604-569-3780 (direct) 1-888-276-8033 (toll free in North America) |
|---|---|
| Fax | 1-604-648-8033 |
| #2 - 605 West Kent Ave. N., Vancouver, British Columbia, Canada, V6P 6T7 | |
| Web | www.zaber.com |
| Please visit our website for up to date email contact information. |
The original instructions for this product are available at https://www.zaber.com/manuals/LST-E.
Appendix A: Default Settings
Please see the Zaber Support Page for default settings for this device.


